Category Archives: Exchange

Unable to find type [short] Set-OrganizationConfig -RejectDirectSend $true

If you don’t have a valid use of DirectSend in Exchange Online, Microsoft recommends that you disable it with this Exchange Online PowerShell cmdlet below. This is a follow-up post to our previous post “An improved approach to blocking Direct Send Abuse.”

Set-OrganizationConfig -RejectDirectSend $true

If you experience an error message “Unable to find type [short]” then it is likely related to your version of PowerShell.  TL;DR you need to upgrade to version 7.

Steps to Fix:

  1. Install PowerShell 7 (latest version recommended – 7.4.0 or later)
  2. Open PowerShell 7 (not Windows PowerShell)
    • Look for “PowerShell 7” in your Start menu
    • It will show “PS” instead of “Windows PowerShell” in the title bar
  3. Install/Update the Exchange Online Management module in PowerShell 7:
  4. Install-Module -Name ExchangeOnlineManagement -Force -Scope CurrentUser
  5. Connect to Exchange Online:
  6. Connect-ExchangeOnline
  7. Run your Set-OrganizationConfig command – it should work now!

Why This Happens

The type “uint” (and “short”) is not built into Windows PowerShell 5.1, but these types are available in PowerShell 7. When the Exchange Online Management module tries to use these types in its internal code, Windows PowerShell 5.1 can’t find them, resulting in the TypeNotFound error.

An improved approach to blocking Direct Send Abuse

Guest post By Chris Lehr

Executive Summary

If you are a Microsoft 365 customer and you are seeing an uptick of spam and phish emails sent to your domain, but also from your domain that seem to be getting past your filters, you will want to see if this issue applies to you and determine the best approach to preventing these from occurring.

Background

Direct Send was introduced initially as ONE of three ways you could migrate your SMTP traffic to M365. Direct Send was the one that was free and easy, you just point your copiers/scanners at your MX record and BOOP – there’s your email. Easy.

Well, it’s been around for 10+ years and lots of customers utilize it. In April 2025, Microsoft announced that they were releasing a way to disable it in your tenant, and the entire Internet seemed to say “Wait, was there an exploit there?” Microsoft stated in that article:

We are working on creating a report for Direct Send traffic that admins can use to get an overview of what traffic will be impacted.”

So, with the announcement of a way to block it and little revelation of how to audit this, those with malintent got right to it, and by mid-July 2025 attacks abusing Direct Send were on the rise. They all have the following hallmarks:

· Sender Domain and Recipient Domain are both your domains

· Failing SPF

· No DKIM signature

· Therefore, failing DMARC

There is an excellent writeup here at Varonis – one of the best writeups of the issue I’ve seen.

With attacks rising, Microsoft released a new blog entry on August 4th, 2025, and it has been edited, revoked temporarily and reposted due to confusion it caused. I hope to be helpful to Microsoft customers here and inclusive of all regardless of how you are configured.

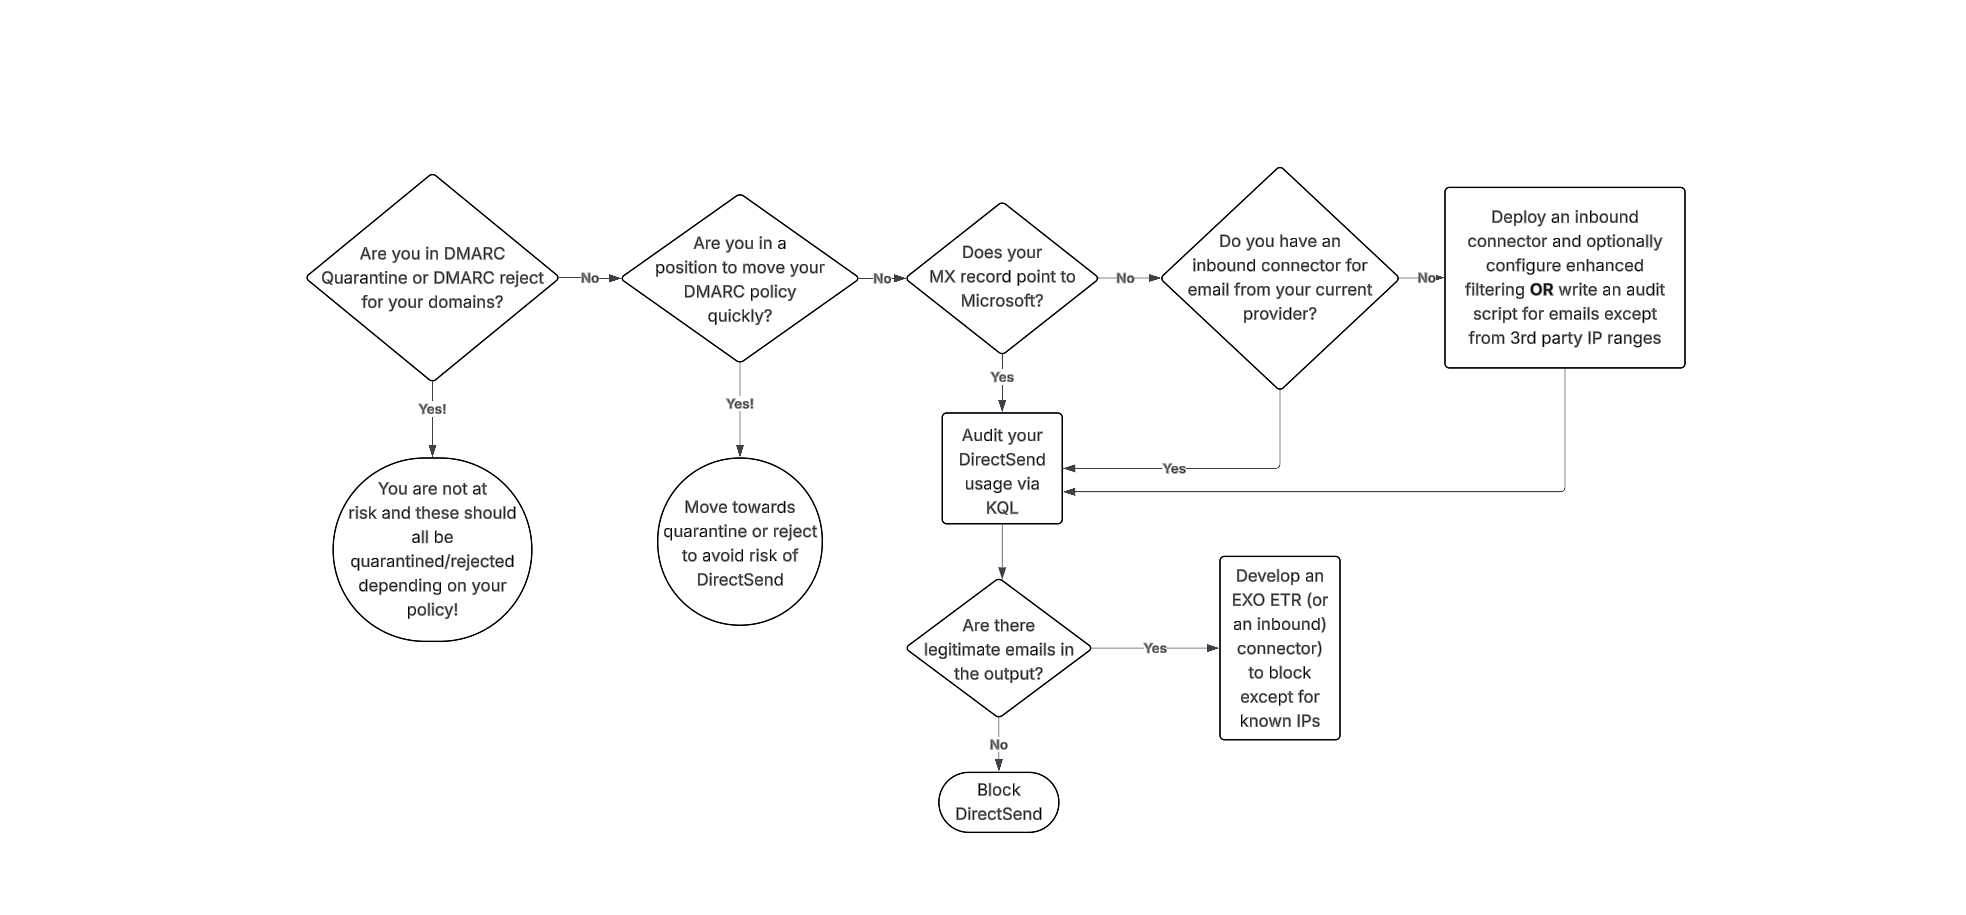
Here is a flowchart as well as a written list on how to audit and block these sort of attacks, regardless of your configuration!

DMARC advancement

The best way to avoid issues with Direct Send abuse is to move your domains to p=quarantine or p=reject. However, if you’re not familiar with DMARC, you should NOT simply change this value – doing so could drastically impact the deliverability of emails that are not SPF and DKIM aligned. If you’re already performing DMARC aggregation, have been at p=none, and are making progress on alignment efforts, you might be able to complete that arduous task to get to p=quarantine and be out of the way of this risk. It’s important to note that this is a complex task – it takes some customers MONTHS of alignment effort!

Additionally, if your domain is set to DMARC quarantine or reject, you still might be at risk if you have any EXO ETRs that are setting SCL -1 or if you are allow-listing via IPv4 in connection filter – both of which essentially bypass DMARC protections by automatically marking mail as safe. More on this below.

Keep in mind that in your tenant, you also would want these settings enabled for DMARC enforcement (from AntiPhishing policy Actions)
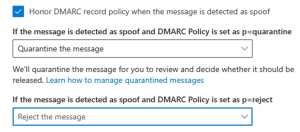
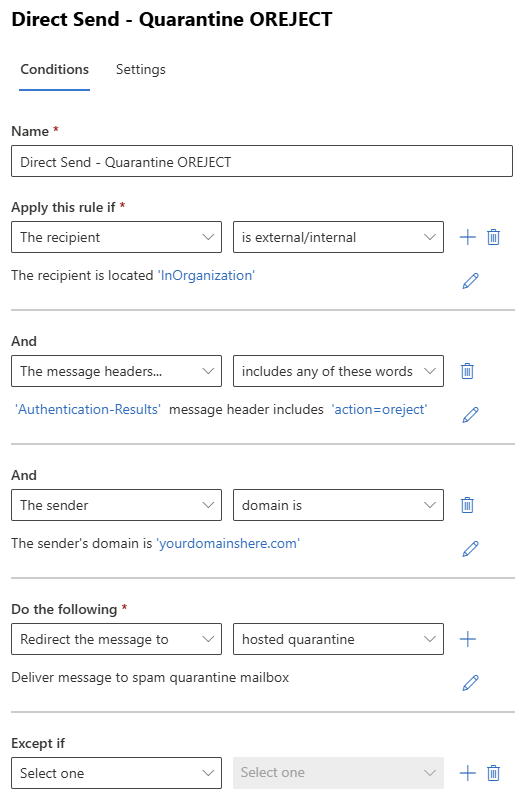
While achieving a DMARC p=reject state is a critical security milestone, Microsoft 365 introduces a specific nuance: the override (action=oreject).

Microsoft may override your DMARC policy in certain scenarios, such as when a DNS lookup fails, or when the SCL is set to -1 due to a misconfigured Exchange Transport rule (ETR), connection filter, or an allowlist. This allows unauthenticated emails (such as Direct Send) to be delivered even when they fail DMARC.

You can confirm if this override is occurring by inspecting the Authentication-Results header. If you see action=oreject, your reject policy was bypassed.

Example 1: SPF Error / Fail Open
Authentication-Results: spf=permerror … dkim=none … dmarc=fail action=oreject … compauth=fail reason=000

Example 2: SCL-1 Bypass
Authentication-Results: spf=fail … dkim=none … dmarc=fail action=oreject … compauth=none reason=451

If you already have your DMARC Record enforced then create the ETR below with a Priority of 0 (run first). This way, if the DNS lookup fails, or when the SCL is set to -1 in any other ETR rule, or any other reason, this rule will still block those direct send attempts.

Auditing the Usage

For organizations wondering, “Are we seeing this threat/attack?” or “We saw one example, how many more are there?” – The Patriot team has collectively answered questions like these a LOT in the last couple of weeks and here is what we have developed to assist. Note, Explorer and KQL are MDO plan 2 benefits – Patriot HIGHLY recommends gaining access to these tools in general but being able to delve into your data like this is a solid reason to make it part of your budget soon.

If your MX points to Microsoft today, I recommend using this KQL:

EmailEvents
|where Timestamp > ago(30d)
| where EmailDirection == ‘Inbound’
| extend LeftPartSender = substring(SenderFromAddress, 0, indexof(SenderFromAddress, ‘@’))
| extend LeftPartRecipient = substring(RecipientEmailAddress, 0, indexof(RecipientEmailAddress, ‘@’))
| where LeftPartSender == LeftPartRecipient
| where isempty(Connectors) // not coming in on a connector
| where DeliveryLocation == ‘Inbox/folder’
| where parse_json(AuthenticationDetails) contains ‘fail’
| project Timestamp, RecipientEmailAddress, SenderFromAddress, Subject, NetworkMessageId, EmailDirection, Connectors, SenderIPv4

You may ask, why not just compare the sender and recipient domain name? In some cases, we have observed the sender domain using a MOERA which is a valid email alias whereas the recipient is their primary SMTP alias. We suspect this was done to evade the exact comparison, so we updated the query above to look for the alias matching on sender and recipient.

If your MX points to a 3rd party today, and you route email inbound to MSFT via an inbound connector, I recommend using this KQL (this is from the MSFT article)

EmailEvents
| where Timestamp > ago(30d)
| where EmailDirection == ‘Inbound’ and Connectors == ” and isnotempty(SenderIPv4) // not coming in on a connector (when you expect things to have used your 3rd party connector
| project Timestamp, RecipientEmailAddress, SenderFromAddress, Subject, NetworkMessageId, EmailDirection, Connectors, SenderIPv4

Now – if you are fortunate, you have no results and can opt to disable DirectSend! (skip down to that section!)

If you have data returned, you need to validate if they are legitimate or not. Obviously this can be subjective, but in most customer scenarios the expected traffic is coming from their datacenters/locations/known IPs. Collect the list of IPs that are needed to be allowed. If the content is too great to parse, feel free to add “| summarize count(by) SenderIPv4” to the end of either query.

Blocking DirectSend with an EXO ETR

If you have audited the KQL output and have a list of sender IPs that are allowed, you can deploy an EXO ETR to block items from your domains that fail DMARC like this one.
Note: Skip this if you already have DMARC enforced (use the ETR rule above instead).
If you do not have any DMARC record published whatsoever, you should first publish the following DNS record (so that the ETR rule below can reach a failure state):
Type: TXT
Name: _dmarc
Value: v=DMARC1; p=none

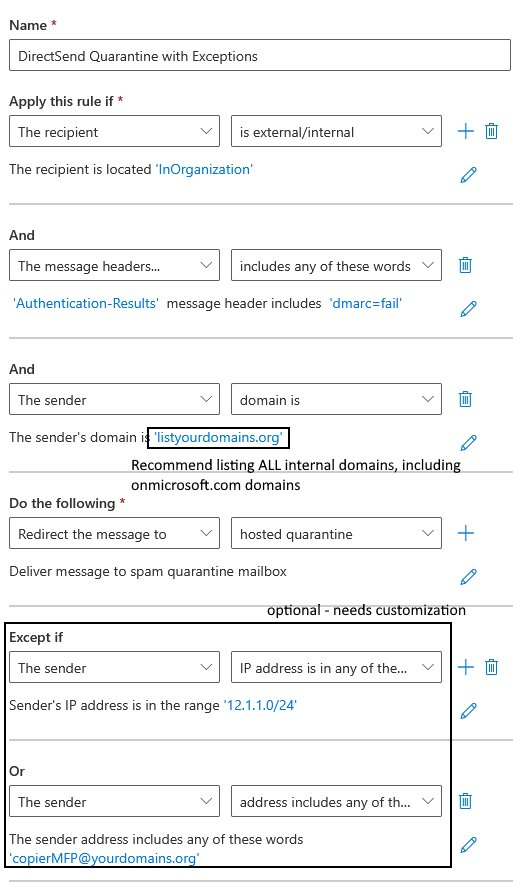
1) Make sure you add all your internal domains to this rule!

2) Make sure you add your IPs/Rangeshere as well!

3) Finally, DO NOT lead in with sending messages straight to quarantine – consider escalating from:

a. Prepend subject/body

b. Set SCL to 9 (to move to JMF/Quarantine with notification)

c. Redirect to hosted Quarantine

Update 8/20/2025 – based on customer feedback we excluded Message Type of Meetings from this rule, since Gmail tenants don’t pass SPF and DKIM for meeting acceptances.

Enable blocking DirectSend with an Inbound Connector

If you audit using KQL and find legitimate emails, collect the sending IP addresses and create an Inbound connector in EXO using these IPs as the source. Then once you confirm in Explorer that the connector is in use, you could proceed with blocking DirectSend.

Blocking DirectSend Completely

If your audit found no results, and you feel 30 days of data is sufficient to make the decision to turn off DirectSend, here is the command to disable DirectSend:

The EXO PowerShell command is:

Set-OrganizationConfig -RejectDirectSend $true
[UPDATE 9/10/2025]: If you experience an error message “Unable to find type [short]” then it is likely related to your version of PowerShell.  TL;DR you need to upgrade to PowerShell version 7. (Reference here)

Once implemented, senders will get NDRs that state:

550 5.7.68 TenantInboundAttribution; Direct Send not allowed for this organization from unauthorized sources

Now, a new problem COULD appear after blocking – since one of the hallmarks here is sending to and from the user, your users could see this NDR. Annoying. If this occurs, here’s a simple EXO ETR to quarantine these confusing outcomes.

Sources:

· https://techcommunity.microsoft.com/blog/exchange/introducing-more-control-over-direct-send-in-exchange-online/4408790

· https://learn.microsoft.com/en-us/exchange/mail-flow-best-practices/how-to-set-up-a-multifunction-device-or-application-to-send-email-using-microsoft-365-or-office-365

· https://www.varonis.com/blog/direct-send-exploit

· https://techcommunity.microsoft.com/blog/exchange/direct-send-vs-sending-directly-to-an-exchange-online-tenant/4439865

· https://learn.microsoft.com/en-us/defender-office-365/anti-phishing-policies-about#spoof-protection-and-sender-dmarc-policies

Microsoft gains on Email Security Market

Microsoft has gained 9% market share in the email security among the Fortune 500 since I last checked in August 2023.

ProofPoint declined for the first time in 5 years, shrinking their market share by -3%. This shows that when the largest organizations are moving, they are now moving to Microsoft for their primary email security solution. Many organizations have found that Microsoft is doing as good of job as ProofPoint (or better) and therefore looking at opportunities to reduce costs. My organization, Patriot, migrates between dozens of companies from ProofPoint, MimeCast, Cisco, Barracuda and others to Microsoft each year.

image

The other trend that is not directly observable by querying public DNS records is the number of organizations augmenting their primary email security solution with a secondary API-based solution such as Abnormal OR Check Point Harmony Email & Collaboration (Check Point acquired Avanan in 2021).

Gartner’s latest research indicates that the number of organizations selecting API-based systems to augment their primary email security solution will grow from 5% to 20% in the next few years.

API-based solutions are reactive by definition and therefore allow malicious payloads to be accessible by the recipient for a short period of time. While not perfect, they can address some of the biggest pain points including Business Email Compromise, Graymail, and Unsolicited Business Emails, which have a big impact on employee productivity.

On the positive front, 67% of the Fortune 500 have configured Domain-based Message Authentication, Reporting & Conformance (DMARC) for Reject or Quarantine. Hackers have already pivoted to compromising valid accounts at organizations using MFA bypass techniques such as EvilGinx, leveraging valid accounts with positive reputation to compromise supply chains.

To combat MFA bypass, Microsoft has recently rolled out mobile-friendly Passkeys which make compromising identities significantly harder for attackers, without the requirement to purchase physical FIDO2 security keys.

Identity and Email Security will remain tightly coupled, as the goal of a phishing email is often to compromise the user identity to gain initial access to an organization. Deploying DMARC, Passkeys, and API-based email security solutions remain high on the agenda at most organizations today.

Disable Exchange Online Remote PowerShell for users as a scheduled task

This PowerShell script can run unattended as a scheduled task and will enumerate the global administrators, then remove remote PowerShell access for any user who is not a global administrator.

#See Prerequisites section below to create these two certificate connection scripts below

Invoke-Expression -Command C:\scripts\connect-certificate.ps1

Invoke-Expression -Command C:\scripts\connect-azureadcertificate.ps1

$GlobalAdmins = Get-AzureADDirectoryRoleMember -ObjectId $(Get-AzureADDirectoryRole -filter “displayname eq ‘Global Administrator'”).ObjectID

$AllUsers = get-user -resultsize unlimited

$UserswithPowerShell = $AllUsers | where {$_.RemotePowerShellEnabled -eq $true}

$UsersWhoAreNotGlobalAdmins = $UserswithPowerShell | where {$_.userprincipalname -notin $GlobalAdmins.userprincipalname}

$counter = ($UsersWhoAreNotGlobalAdmins).count
$current = 1

if ($UsersWhoAreNotGlobalAdmins) {
write-host “Users who currently have remote powershell access” ($UserswithPowerShell).count
foreach ($user in $UsersWhoAreNotGlobalAdmins) {
write-host “Removing PowerShell access from user ” $current ” of ” $counter “(” $user.userprincipalname “)”
set-user -identity $user.userprincipalname -RemotePowerShellEnabled $false

#Optional, the next statement can also apply a authentication policy to block basic auth

#Set-User -identity $user.userprincipalname -AuthenticationPolicy “Block Basic Auth”
$current = $current + 1

}
}
else
{
write-host “there are no non-global admin users with PowerShell access”
}

Download the script (here).

Prerequisites: Create two Azure AD Applications (1) Exchange and (2) Azure AD

TIP: When creating the Scheduled Task,  the account must have the Logon as a service right assigned. Then the ‘action’ to start a program points to c:\windows\system32\windowspowershell\v1.0\powershell.exe
then the arguments are: -File “c:\scripts\scriptname.ps1”

Is your Exchange Hybrid Server internet-facing? You have likely already been hacked

– This is twice as big as the SolarWinds breach.

– Patching is not enough! If your Exchange Server was open to the internet via TCP 80 or 443 between February 26 and March 3rd (or later) assume it was compromised.

At least 30,000 organizations have had a backdoor installed on their Microsoft Exchange Server (on-premises).

We know it is at least this many because researchers have built an NMAP script to scan the internet for infected hosts.

There is nothing to indicate that Exchange Online has been impacted, but organizations in O365 could still have been hacked because most of those customers still have an internet-facing Exchange Hybrid server.

How to hunt for the existence of a backdoor known as a web shell.
(A web shell is an internet accessible web page that the hacker places on the Exchange Server that gives the attackers administrative access to the Exchange Server)

Indicators of Compromise 

web.aspx
help.aspx
document.aspx
errorEE.aspx
errorEEE.aspx
errorEW.aspx
errorFF.aspx
healthcheck.aspx
aspnet_www.aspx
aspnet_client.aspx
xx.aspx
shell.aspx
aspnet_iisstart.aspx
one.aspx
RedirSuiteServerProxy.aspx
y.js
<random_name>.aspx (often 8 characters)

In these directories:

o c:\inetpub\wwwroot\aspnet_client\

o c:\inetpub\wwwroot\aspnet_client\system_web\

o C:\Exchange\FrontEnd\HttpProxy\owa\auth\

o %PROGRAMFILES%\Microsoft\Exchange Server\V15\FrontEnd\HttpProxy\owa\auth\

– Signs of large amounts of SMB network traffic from the Exchange Server to internal network

– Scheduled Task on Exchange Server named Winnet

– Check for suspicious .zip, .rar, and .7z files in C:\ProgramData\, which may indicate possible data exfiltration.

– Monitor c:\root and c:\windows\temp for LSASS dumps (attackers used procdump64.exe) or rundll32 C:\windows\system32\comsvcs.dll MiniDump lsass.dmp

In some cases, additional dynamic link libraries (DLLs) and compiled aspx files are created shortly after the  webshells are first interacted with via POST requests in the following locations:

  • C:\Windows\Microsoft.NET\Framework64\<version>\Temporary ASP.NET Files\root\
  • C:\Windows\Microsoft.NET\Framework64\<version>\Temporary ASP.NET Files\owa\

Administrator is removed from the “Exchange Organization administrators” group (credit rapid7)

– Scan Exchange Logs for IOCs (manually here) or with the Microsoft script (here)

– You can also use this NMAP script to see if your servers are vulnerable after patching them.

In the attacks observed, the threat actor used these vulnerabilities to access on-premises Exchange servers which enabled access to email accounts and allowed installation of additional malware to facilitate long-term access to victim environments.

On March 6th, a security researcher created a honeypot with these vulnerabilities and found that it was exploited 5 times in less than 24 hours. This indicates several copy-cat threat actors are already targeting these vulnerabilities.

If you find evidence of compromise, activate your incident response procedures. You may have a legal requirement to notify within 72 hours of sensitive data was accessed in your email or network.

What versions are affected?

– Exchange 2013 Versions < 15.00.1497.012

– Exchange 2016 CU18 < 15.01.2106.013

– Exchange 2016 CU19 < 15.01.2176.009

– Exchange 2019 CU7 < 15.02.0721.013

– Exchange 2019 CU8 < 15.02.0792.010

– Microsoft issued CU 31 for Exchange Server 2010 – best to apply that, but it would be better to upgrade your hybrid server since Exchange 2010 normally does not receive security updates (this was a kind gesture on Microsoft’s part).

How do we prevent this from happening again?

– The only reason an Exchange Hybrid Server should still be internet-facing is if there are still on-premises mailboxes. Move those to the cloud and then shut off internet access to your hybrid server after moving the Autodiscover DNS record to point to Autodiscover.outlook.com.

– If you have no on-premises mailboxes, you should close TCP 80/443 after moving Autodiscover to cloud

Learn more: Read the announcement, or view the Exchange blog. We also recommend the Volexity post (here) and Rapid7 post (here).

Use PowerShell to Connect to Exchange Online unattended in a Scheduled Task

If you have MFA enabled, how do you connect to Exchange Online in an unattended script, like a Scheduled Task? Some people may have embedded a password into their scripts, but that will stop working in mid 2021 when Microsoft retires basic authentication in Office 365.

Microsoft has a preview version of Exchange Online v2 PowerShell that allows you to use a Certificate to authenticate.

Why Certificates? Because you don’t want an MFA push notification on your iPhone every morning at 1:00 AM, right?

Recommendation: Review to see if you have any automated scripts connecting to Exchange Online (typically scheduled tasks).

How? Follow the steps below to use certificates to connect to Exchange Online PowerShell

Prerequisites

Install-Module ExchangeOnlineManagement -RequiredVersion 2.0.3-Preview

Or if you already have a previous version of the module installed:

Update-Module ExchangeOnlineManagement -RequiredVersion 2.0.3-Preview

Note: If you get an error “A parameter cannot be found that matches parameter name ‘AllowPrerelease’” then run this command
Install-Module PowershellGet -Force (then close and re-open PowerShell)

Instructions

  1. Register an app in Azure AD (here).
    (The app is the entry point to Exchange Online PowerShell because it creates a service account called a service principal to perform administrative actions)
    image
  2. Click API Permissions on left navigation > Add a permission
    image
  3. Scroll to the bottom of the Request API permissions pane and click on Exchange under the Supported legacy APIs section.
    image
  4. Click on Application permissions
    image

  5. Expand the Exchange entry, and select the Exchange.ManageAsApp permission.
    Click the
    Add permissions button below to complete the operation.
    image
  6. Click “Grant Admin consent for your tenant”
    image
  7. Create a Role to assign to the App (Thanks to Tony Redmond for this tip)

$ExoAppSp = (Get-AzureADServicePrincipal -Filter “DisplayName eq ‘Exchange Online Scripting'”).ObjectId

$ExoRoleId = (Get-AzureADDirectoryRole | ? {$_.DisplayName -eq “Exchange Service Administrator”}).ObjectId

Add-AzureADDirectoryRoleMember -ObjectId $ExoRoleId -RefObjectId $ExoAppSp

  1. Create a self-signed X.509 certificate that will be used for authentication
    New-SelfSignedCertificate -Subject “Exo Background Process” -CertStoreLocation “cert:\CurrentUser\My” -KeySpec KeyExchange -FriendlyName “For EXO V2 Background Jobs”
  2. Open MMC, add Certificates, Find the new Cert, and Export it *without* the private key, as a .CER file.
    image
  3. Upload this file to the app you registered in the Azure Portal
    image

After adding the certificate, we need three items before we can finally connect unattended with PowerShell

  • The AppId of the application you created.
    Get-AzureADApplication -Filter “DisplayName eq ‘Exchange Online Scripting'”
  • The thumbprint of the certificate loaded into the app
    Get-ChildItem -path ‘Cert:\*’ -Recurse |where {$_.Subject -like ‘*EXO*’}
  • The service domain for your tenant (like tenant.onmicrosoft.com).

With these values, you can connect to Exchange Online using certificate-based authentication with a command like:
Connect-ExchangeOnline -CertificateThumbprint ” 960BD967A9287CE83DF4138805B5CE2FCA4C9B8B” -AppId “b83c46c6-044e-40e5-929c-634f80045a11” -ShowBanner:$false -Organization tenant.onmicrosoft.com

To connect to Azure AD with a certificate see:

Using a service principal | Microsoft Docs

References

· Microsoft Documentation

· Vasil Michev

· Tony Redmond: Office 365 IT Pros

Deploying MailItemsAccessed Audit Event in Office 365

MailItemsAccessed is a new audit event in Office 365 that records when email data is accessed by mail protocols and clients.

Why is MailItemsAccessed so important?

During an investigation where a mailbox has been accessed by an unauthorized party, there are often legal requirements (State, Federal and Global Treaties such as GDPR) to notify individuals if their personally identifiable information was accessed. Without MailItemsAccessed we could only say that the attacker had the capability of accessing all mailbox contents, but we couldn’t say which exact emails were accessed. The sync event is still not as definitive as we would like, but it does show that the attacker now has possession of the mailbox contents. If the attacker accessed the mailbox via a web browser, then it’s helpful to know which individual items were accessed.

If a privileged account was compromised, it’s also a good idea to check whether the attacker enabled the Bypass audit log PowerShell command to cover their tracks.

For more details, see Access to crucial events for investigations.

How does MailItemsAccessed compare to MessageBind?

MailItemsAccessed replaces the audit event ‘MessageBind’ which was deprecated in Exchange Online on 1/23/2019. This audit event began rolling out in Q1 2020 after a 12 month pause from the first announcement in January 2019. Tony Redmond has documented the history of this rollout on his blog, with his latest post on March 6, 2020 (here).

MessageBind was only available for the AuditAdmin user logon type and did not record actions performed by the Mailbox Owner or Delegate. MessageBind only covered actions by a mail client and did not record sync activities. MessageBind also generated multiple audit records for the same email message. MailItemsAccessed fixes all these deficiencies.

MailItemsAccessed applies to all logon types (Owner, Admin and Delegate)

MailItemsAccessed applies to both an individual email being read in addition to a ‘sync’ event such as MAPI, POP or IMAP downloading all email in a client.

MailItemsAccessed aggregates multiple events into fewer audit records.

Licensing

Office E5 or (M365 E3 + “E5 Compliance” add-on)

One question that is often asked is: “If I buy just one license, does this enable the capability for all users.” The answer is no. Only users with the appropriate license will have the MailItemsAccessed logged.

Deployment

MailItemsAccessed is only enabled by default when the E5 feature “Microsoft 365 Advanced Auditing” license has been applied to the account.

clip_image002

(In PowerShell the auditing license will appear as “M365_ADVANCED_AUDITING”).

To find out how many of your current mailboxes are logging the MailItemsAccessed event run this Exchange Online PowerShell command:

get-mailbox -ResultSize unlimited | where {$_.AuditOwner -like ‘*Accessed*’}

Note: See troubleshooting section if you have the right license and MailItemsAccessed is still not appearing.

Prior to 2/1/2019, Mailbox Owner auditing only logged a single event by default: MailboxLogin. After 2/1/2019, additional events were added unless auditing had been customized. If you customized the mailbox actions to audit for any logon type before mailbox auditing on by default was enabled in your organization, the customized settings are preserved on the mailbox and aren’t overwritten by the default mailbox actions that were since added. The exception to this rule seems to be with MailItemsAccessed because it was appended to the E5 mailboxes that had been set to use customized audit events.

To reset auditing to defaults you can run use the DefaultAuditSet parameter, which is generally recommended because according to the documentation “Any new mailbox actions that are released by Microsoft are automatically added to the list of audited actions for the logon type.”

Set-Mailbox -Identity (mailbox identity) –DefaultAuditSet Admin,Delegate,Owner

If you want to find out the mailboxes that have the default auditing enabled, run this command and look for “Admin, Delegate, Owner.” The absence of one of these means that audit customizations was applied to that mailbox.

get-mailbox | select name,DefaultAuditSet

clip_image004

For example, in the screen shot above (1) means that all three roles were customized and (2) means only the Owner was customized because it is absent from the list.

Note: DefaultAuditSet does not audit all possible audit events. It will audit the following seven events (or eight when an E5 license is applied to the mailbox)

1. Update

2. MoveToDeletedItems

3. SoftDelete

4. HardDelete

5. UpdateFolderPermissions

6. UpdateInboxRules

7. UpdateCalendarDelegation

8. MailItemsAccessed (<- THIS IS ONLY ADDED IF AN E5 License is applied to the mailbox)

For a list of the defaults see the documentation (here).

The following three events can be added as additional audit events for the Owner logon type:

1. Create

2. MailboxLogin

3. Move

Therefore, to apply all 11 possible audit events, run this command:

get-mailbox -ResultSize unlimited | set-mailbox -AuditOwner @{Add= “Update”,”MoveToDeletedItems”,”SoftDelete”,”HardDelete”,”UpdateFolderPermissions”,”UpdateInboxRules”,”UpdateCalendarDelegation”,”Create”,”MailboxLogin”,”Move”,”MailItemsAccessed”}

Repeat above command and swap out AuditOwner for AuditDelegate and AuditAdmin but remember to check the table (here) because not all audit events are available for Admin

Note: A user with full mailbox access to another user’s mailbox is logged as AuditDelegate.

Searching Audit Events

You can search for MailItemsAccessed events in Protection.office.com

image

Compliance.microsoft.com will eventually replace Protection.office.com.

image

You can also use Exchange Online PowerShell to search for audit events, which is required if you need to search for events older than 90 days. Search-UnifiedAuditLog -Operations MailItemsAccessed or Search-MailboxAuditLog -Operations MailItemsAccessed

Other useful Exchange Online PowerShell commands:

View which events are being logged on a single mailbox (“Joe”)

get-mailbox joe | select -ExpandProperty auditadmin

get-mailbox joe | select -ExpandProperty auditowner

get-mailbox joe | select -ExpandProperty auditdelegate

Report how many accounts have auditing enabled:

get-mailbox | group-object AuditEnabled

Enable auditing on all mailboxes and increase audit log retention from 90 days to 180 days:

get-mailbox -resultsize unlimited | set-mailbox -AuditEnabled $true -AuditLogAgeLimit 180

Audit Log retention is independent of whether or not a retention policy (aka Legal hold) is applied to the mailbox. For example, if a mailbox is under legal hold, the audit events are not retained longer than the duration set by the AuditLogAgeLimit parameter.

If you increase the age beyond 90 days, you can only find those items in PowerShell using Search-MailboxAuditLog.

The following capacity limitations apply to mailbox auditing:

– No more than 3 million audit records are allowed per mailbox

– No more than 30 GB of audit records are allowed per mailbox (100GB if legal hold or retention policy has been applied to the mailbox)

– Tony also states in his blog “Exchange Online applies throttling for MailItemsAccessed events. If a mailbox generates more than 1,000 bind events in a 24-hour period, Exchange Online stops recording MailItemsAccessed events for bind operations for another 24 hours before resuming capture of these events. Microsoft says that less than 1% of mailboxes are subject to throttling.”

Troubleshooting

Assume you have a mailbox where MailItemsAccessed is not applied, but the mailbox has an E5 license.

clip_image010

You then try to add the audit event but you get an error that its only available for users with the appropriate license.

clip_image012

Double-check to see that you have the “Microsoft 365 Advanced Auditing” license type assigned.

clip_image013

Note: In my case, even though the box was checked, it did not work because this license assignment was inherited from an Azure AD P1 feature called Group-based licensing. So to work-around this bug, I directly assigned the license via PowerShell (since I couldn’t via the GUI since the checkbox was already selected) and that allowed the MailItemsAccessed to be applied.

clip_image015

$MSOLSKU = “(tenantname):ENTERPRISEPREMIUM”

$myO365Sku1 = New-MsolLicenseOptions -AccountSkuId $MSOLSKU

Set-MsolUserLicense -UserPrincipalName (username) -LicenseOptions $myO365Sku1

Top 10 Fixes for troubleshooting free/busy between Exchange on-premises and Exchange Online in Office 365

Free/busy often fails to work out-of-the-box after configuring Hybrid Exchange with Office 365. Here are my top ten fixes:


  1. Set the sharing policy to match on-premises and cloud.

    First, Connect to Exchange Online Remote Powershell and run get-sharingpolicy

    Then connect to on-premises Exchange Management Shell and run get-sharing policy

    Then make the two match on both sides.


Set-SharingPolicy -Identity SharingPolicy01 -Domains ‘contoso.com: CalendarSharingFreeBusySimple’, ‘atlanta.contoso.com: CalendarSharingFreeBusyReviewer’, ‘beijing.contoso.com: CalendarSharingFreeBusyReviewer’


  1. Set the organization relationship domains to include all accepted domains on both on-premises and cloud (always requires an IISRESET for it to take effect)
    This script helps identify missing domains in an existing relationship:


    if ( (Get-OrganizationRelationship).DomainNames -contains (Get-Mailbox user).PrimarySmtpAddress.Domain) { write-host “The domain was found” -ForegroundColor Green } else { write-host (Get-Mailbox user).PrimarySmtpAddress.Domain “was not found” -ForegroundColor Yellow}


    $OrgRel = Get-OrganizationRelationship Contoso

    $OrgRel.DomainNames += “contoso.com”

    Set-OrganizationRelationship $OrgRel.Name -DomainName $OrgRel.DomainNames


    1. If the autodiscover DNS name is not published in external DNS, and if the client doesn’t want to do that, then manually configure TargetSharingEpr to use the published EWS path

      Get-OrganizationRelationship -Identity “O365 to On-premises – (GUID)” | Set-OrganizationRelationship -TargetSharingEpr https://mail.contoso.com/ews/exchange.asmx

    4) For ‘401 errors’ try disabling the IOC connector in Exchange 2013 to have oAuth fall back to dAuth


    5) Sometimes it’s necessary to set the on-premises EWS virtual directory “WSSecurityAuthentication” value back to defaults (some clients change this if they do load balanced CAS)
    (this is commonly a last resort)

    Need to change WSSecurityAuthentication to False for EWS Virtual directory.

        a.       Set-WebServicesVirtualDirectory “Exch CAS\ews*” –WSSecurityAuthentication $false

        b.      Need to Stop MSExchangeServicesAppPool.

        c.       Need to Start  MSExchangeServicesAppPool.


      Need to change WSSecurityAuthentication to True again for EWS Virtual Directory.

        a.       Set-WebServicesVirtualDirectory “Exch CAS\ews*” –WSSecurityAuthentication $True

        b.      Need to Stop MSExchangeServicesAppPool.

        c.       Need to Start  MSExchangeServicesAppPool.


      Need to change WSSecurityAuthentication to False for Autodiscover Virtual directory.

        a.       Set-AutodiscoverVirtualDirectory “Exch CAS\Auto*” –WSSecurityAuthentication $false

        b.      Stop MSExchangeAutodiscoverAppPool.

        c.       Start  MSExchangeAutodiscoverAppPool.


      Change WSSecurityAuthentication to True again for Autodiscover Virtual Directory.

        a.       Set-AutodiscoverVirtualDirectory “Exch CAS\Auto*” –WSSecurityAuthentication $true

        b.      Stop MSExchangeAutodiscoverAppPool.

        c.       Start  MSExchangeAutodiscoverAppPool.


    6) If the Exchange Server is behind a web proxy then it is usually necessary to configure InternetWebProxy Set-ExchangeServer <Server Name> -InternetWebProxy:http://<Proxy Address>:<Proxy Port>


    7)  Verify the availability address space and see required SMTP domain with access method.

        Get-AvailabilityAddressSpace (Run this on-prem)


    8) Try running diagnostic commands:
    You can also use the Test-FederationTrust (on prem only) and Test-OrganizationRelationship  (run this both on prem and in cloud too)

    And you can also use this website to run tests: https://www.testexchangeconnectivity.com/

    9) Make sure that the cloud user you are searching for has a valid (tenant).mail.onmicrosoft.com alias on their target mailbox (make sure Azure AD Connect is properly replicating that attribute, and/or, that the Exchange Address Policy is not blocking inheritance on that particular user/object).


    10) Run these commands to gather diagnostic information:

    Onpremises:

    Start-Transcript

    Get-FederationTrust | fl

    Get-FederatedOrganizationIdentifier | fl

    Get-OrganizationRelationship | fl

    Get-WebServicesVirtualDirectory | Export-Clixml C:\temp\WebVdir.xml

    Get-AutoDiscoverVirtualDirectory | Export-Clixml C:\temp\AutoDVdir.xml

    Get-RemoteMailbox bobc_sync | fl

    Get-Mailbox “on-premises John Doe User” | fl

    Test-FederationTrust -UserIdentity [email protected] | fl

    Test-FederationTrustCertificate | fl

    Get-IntraOrganizationConnector | fl

    Stop-Transcript


    Online:

    Start-Transcript

    Get-FederationTrust | fl

    Get-FederatedOrganizationIdentifier | fl

    Get-OrganizationRelationship | fl

    Get-MailUser “on-premises John Doe User” | fl

    Get-Mailbox “Cloud user” | fl

    Get-IntraOrganizationConnector | fl

    get-OrganizationRelationship | Test-OrganizationRelationship -UserIdentity “cloud user”

    Stop-Transcript


    And when all else fails I reference these two blog articles:

    https://blogs.technet.microsoft.com/exchange/2018/02/06/demystifying-hybrid-freebusy-what-are-the-moving-parts/

    and 

    https://blogs.technet.microsoft.com/exchange/2018/03/02/demystifying-hybrid-freebusy-finding-errors-and-troubleshooting/

How to fix Exchange Online Hybrid Outbound Connector 454 4.7.5 Certificate Validation Failure

While recently helping a client setup an Exchange Hybrid, the cloud to on-premises mail flow was failing validation due to 454 4.7.5 Certificate Validation Failure.

The next step was to verify that the TlsCertificateName value was properly set on the send and receive connectors to match the certificate name, following these articles:

https://blogs.technet.microsoft.com/lalitbisht/2017/06/03/mailflow-issue-from-exchange-on-prem-to-office-365/

https://practical365.com/exchange-server/configuring-the-tls-certificate-name-for-exchange-server-receive-connectors/

In this case, the TlsCertificateName was already set correctly to match the certificate name (the Hybrid Exchange Wizard does a good job at setting that correctly).

The next step was to enable Verbose logging on the on-premises receive connector so that we can get a better look at the error.

To save time, I restarted the “Microsoft Exchange Frontend Transport” service so that the logging would take effect sooner.

Then navigating to the log directory can be a bit tricky:

C:\Program Files\Microsoft\Exchange Server\v15\TransportRoles\Logs\FrontEnd\ProtocolLog\SmtpReceive

Opening up the file revealed a very helpful bit of information! The SSL Certificate that Microsoft Office 365 is presenting to the Exchange server for the TLS encrypted email is not a trusted root. How can this be?


To cut to the chase, the root cause was that the server had not had windows updates run in a LONG time and therefore was really far behind in its root certificates.

The least disruptive solution was to download the Office certificate chains from Microsoft (here) and install them on the on-premises Exchange Server. Then after restarting the “Microsoft Exchange Frontend Transport” service and waiting a few minutes, the validation was successful.

PowerShell script to automatically heal non-deliverable emails (NDRs) as X500

One of the possible causes for a non-delivery report (NDR) is when a mail object in Exchange is moved or removed (Contact, Mailbox, MailUser, etc). When an object is moved, any internal user who had previously emailed that object will have a cached entry in their autocomplete cache that no longer matches up to what now exists. This happens because the autocomplete cache stores the value of the LegacyExchangeDN attribute of the original object before it is moved. When an object is moved, a new LegacyExchangeDN is created.

When sending a message, Outlook will check the Global Address List (GAL), and if it can’t find a match in the GAL, IMCEA encapsulation is used (Internet Mail Connector Encapsulated Addressing). An IMCEA encapsulated address looks like:

IMCEAEX-_O=CONTOSO_OU=First+20Administrative+20Group_cn=Recipients_cn=JDOE@contoso.com

So when an email is sent to the original cached object, an NDR will be sent back to the user containing a construct of the LegacyExchangeDN that it failed to reach, in a slightly different format:

A trailing “EX” at the end of IMCEAEX indicates that a non-SMTP address was encapsulated.

While a quick fix is to have the sender clear their autocomplete cache and re-send the message, a more automated solution is desirable when there are hundreds of potential senders who cached the old object.

I discovered a nifty PowerShell script (here) written by Michael England on 2/11/2013 that searches the Message Tracking Logs for NDRs, and then reconstructs the LegacyExchangeDN from the IMCEA format and adds that as an X500 proxy alias on the target recipient object (if it can be found). This works great in a scenario where the contact object was replaced by a Mailbox or MailUser object.

One of the things I appreciate about how he wrote this script is that when you run the script it reports what would be modified, then when you are ready to modify you just add the -Autoheal parameter to the end of the script. This way you can get an idea of what would be modified before it happens.

I had to modify Michael’s script because Microsoft changed the behavior of the LegacyExchangeDN value in Exchange 2010 SP1 Rollup 6 (released 10/27/2011) to add 3 random hex characters for uniqueness at the end of the LegacyExchangeDN. So when I attempted to use Michael’s script, it was not finding the destination object to add the X500 to it because the 3 random characters threw the search off. So I have posted a very minor change to an otherwise awesome script to strip the 3 characters when searching for the object to place the proxy alias on.

            Write-Host “looking for: ” $user.Substring(0,$user.Length-3)

            $user = $user.Substring(0,$user.Length-3)


I also made three separate copies, depending on the recipient object type (Mailbox, MailContact or MailUser).

You can download my slightly modified version of Michael’s script from the Microsoft Technet Gallery here.

https://gallery.technet.microsoft.com/Search-Message-Tracking-6be6d1b7

I left all original credit to Michael in the script, since I only slightly changed the code to strip the 3 random hex characters out, and made separate copies of the script to search for MailUser and MailContact since his script only searched for Mailboxes. I was stoked to discover this awesome script by Michael.

Also shout out to a different Michael, Michael de Rooij for an excellent blog article on this topic here: https://eightwone.com/2013/08/12/legacyexchangedn-attribute-myth/