Category Archives: Office 365

Deploying MailItemsAccessed Audit Event in Office 365

MailItemsAccessed is a new audit event in Office 365 that records when email data is accessed by mail protocols and clients.

Why is MailItemsAccessed so important?

During an investigation where a mailbox has been accessed by an unauthorized party, there are often legal requirements (State, Federal and Global Treaties such as GDPR) to notify individuals if their personally identifiable information was accessed. Without MailItemsAccessed we could only say that the attacker had the capability of accessing all mailbox contents, but we couldn’t say which exact emails were accessed. The sync event is still not as definitive as we would like, but it does show that the attacker now has possession of the mailbox contents. If the attacker accessed the mailbox via a web browser, then it’s helpful to know which individual items were accessed.

If a privileged account was compromised, it’s also a good idea to check whether the attacker enabled the Bypass audit log PowerShell command to cover their tracks.

For more details, see Access to crucial events for investigations.

How does MailItemsAccessed compare to MessageBind?

MailItemsAccessed replaces the audit event ‘MessageBind’ which was deprecated in Exchange Online on 1/23/2019. This audit event began rolling out in Q1 2020 after a 12 month pause from the first announcement in January 2019. Tony Redmond has documented the history of this rollout on his blog, with his latest post on March 6, 2020 (here).

MessageBind was only available for the AuditAdmin user logon type and did not record actions performed by the Mailbox Owner or Delegate. MessageBind only covered actions by a mail client and did not record sync activities. MessageBind also generated multiple audit records for the same email message. MailItemsAccessed fixes all these deficiencies.

MailItemsAccessed applies to all logon types (Owner, Admin and Delegate)

MailItemsAccessed applies to both an individual email being read in addition to a ‘sync’ event such as MAPI, POP or IMAP downloading all email in a client.

MailItemsAccessed aggregates multiple events into fewer audit records.

Licensing

Office E5 or (M365 E3 + “E5 Compliance” add-on)

One question that is often asked is: “If I buy just one license, does this enable the capability for all users.” The answer is no. Only users with the appropriate license will have the MailItemsAccessed logged.

Deployment

MailItemsAccessed is only enabled by default when the E5 feature “Microsoft 365 Advanced Auditing” license has been applied to the account.

clip_image002

(In PowerShell the auditing license will appear as “M365_ADVANCED_AUDITING”).

To find out how many of your current mailboxes are logging the MailItemsAccessed event run this Exchange Online PowerShell command:

get-mailbox -ResultSize unlimited | where {$_.AuditOwner -like ‘*Accessed*’}

Note: See troubleshooting section if you have the right license and MailItemsAccessed is still not appearing.

Prior to 2/1/2019, Mailbox Owner auditing only logged a single event by default: MailboxLogin. After 2/1/2019, additional events were added unless auditing had been customized. If you customized the mailbox actions to audit for any logon type before mailbox auditing on by default was enabled in your organization, the customized settings are preserved on the mailbox and aren’t overwritten by the default mailbox actions that were since added. The exception to this rule seems to be with MailItemsAccessed because it was appended to the E5 mailboxes that had been set to use customized audit events.

To reset auditing to defaults you can run use the DefaultAuditSet parameter, which is generally recommended because according to the documentation “Any new mailbox actions that are released by Microsoft are automatically added to the list of audited actions for the logon type.”

Set-Mailbox -Identity (mailbox identity) –DefaultAuditSet Admin,Delegate,Owner

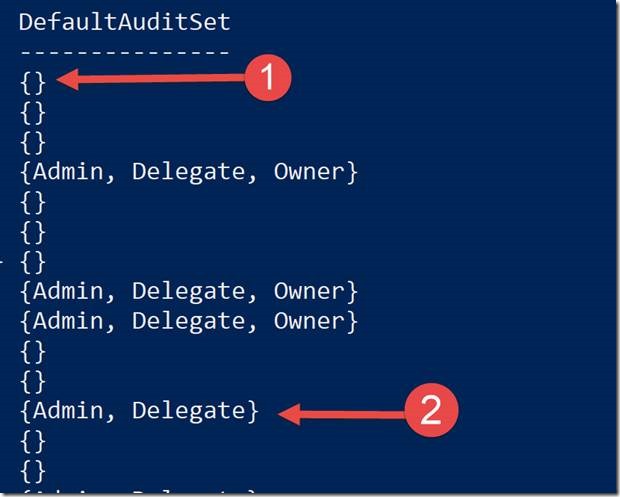
If you want to find out the mailboxes that have the default auditing enabled, run this command and look for “Admin, Delegate, Owner.” The absence of one of these means that audit customizations was applied to that mailbox.

get-mailbox | select name,DefaultAuditSet

clip_image004

For example, in the screen shot above (1) means that all three roles were customized and (2) means only the Owner was customized because it is absent from the list.

Note: DefaultAuditSet does not audit all possible audit events. It will audit the following seven events (or eight when an E5 license is applied to the mailbox)

1. Update

2. MoveToDeletedItems

3. SoftDelete

4. HardDelete

5. UpdateFolderPermissions

6. UpdateInboxRules

7. UpdateCalendarDelegation

8. MailItemsAccessed (<- THIS IS ONLY ADDED IF AN E5 License is applied to the mailbox)

For a list of the defaults see the documentation (here).

The following three events can be added as additional audit events for the Owner logon type:

1. Create

2. MailboxLogin

3. Move

Therefore, to apply all 11 possible audit events, run this command:

get-mailbox -ResultSize unlimited | set-mailbox -AuditOwner @{Add= “Update”,”MoveToDeletedItems”,”SoftDelete”,”HardDelete”,”UpdateFolderPermissions”,”UpdateInboxRules”,”UpdateCalendarDelegation”,”Create”,”MailboxLogin”,”Move”,”MailItemsAccessed”}

Repeat above command and swap out AuditOwner for AuditDelegate and AuditAdmin but remember to check the table (here) because not all audit events are available for Admin

Note: A user with full mailbox access to another user’s mailbox is logged as AuditDelegate.

Searching Audit Events

You can search for MailItemsAccessed events in Protection.office.com

image

Compliance.microsoft.com will eventually replace Protection.office.com.

image

You can also use Exchange Online PowerShell to search for audit events, which is required if you need to search for events older than 90 days. Search-UnifiedAuditLog -Operations MailItemsAccessed or Search-MailboxAuditLog -Operations MailItemsAccessed

Other useful Exchange Online PowerShell commands:

View which events are being logged on a single mailbox (“Joe”)

get-mailbox joe | select -ExpandProperty auditadmin

get-mailbox joe | select -ExpandProperty auditowner

get-mailbox joe | select -ExpandProperty auditdelegate

Report how many accounts have auditing enabled:

get-mailbox | group-object AuditEnabled

Enable auditing on all mailboxes and increase audit log retention from 90 days to 180 days:

get-mailbox -resultsize unlimited | set-mailbox -AuditEnabled $true -AuditLogAgeLimit 180

Audit Log retention is independent of whether or not a retention policy (aka Legal hold) is applied to the mailbox. For example, if a mailbox is under legal hold, the audit events are not retained longer than the duration set by the AuditLogAgeLimit parameter.

If you increase the age beyond 90 days, you can only find those items in PowerShell using Search-MailboxAuditLog.

The following capacity limitations apply to mailbox auditing:

– No more than 3 million audit records are allowed per mailbox

– No more than 30 GB of audit records are allowed per mailbox (100GB if legal hold or retention policy has been applied to the mailbox)

– Tony also states in his blog “Exchange Online applies throttling for MailItemsAccessed events. If a mailbox generates more than 1,000 bind events in a 24-hour period, Exchange Online stops recording MailItemsAccessed events for bind operations for another 24 hours before resuming capture of these events. Microsoft says that less than 1% of mailboxes are subject to throttling.”

Troubleshooting

Assume you have a mailbox where MailItemsAccessed is not applied, but the mailbox has an E5 license.

clip_image010

You then try to add the audit event but you get an error that its only available for users with the appropriate license.

clip_image012

Double-check to see that you have the “Microsoft 365 Advanced Auditing” license type assigned.

clip_image013

Note: In my case, even though the box was checked, it did not work because this license assignment was inherited from an Azure AD P1 feature called Group-based licensing. So to work-around this bug, I directly assigned the license via PowerShell (since I couldn’t via the GUI since the checkbox was already selected) and that allowed the MailItemsAccessed to be applied.

clip_image015

$MSOLSKU = “(tenantname):ENTERPRISEPREMIUM”

$myO365Sku1 = New-MsolLicenseOptions -AccountSkuId $MSOLSKU

Set-MsolUserLicense -UserPrincipalName (username) -LicenseOptions $myO365Sku1

Clear Teams Cached Credentials

Today (2/3/2020) MS Teams is experiencing an outage.

In our testing we were able to get back into teams by clearing the Teams cached credentials from Credential Manager.

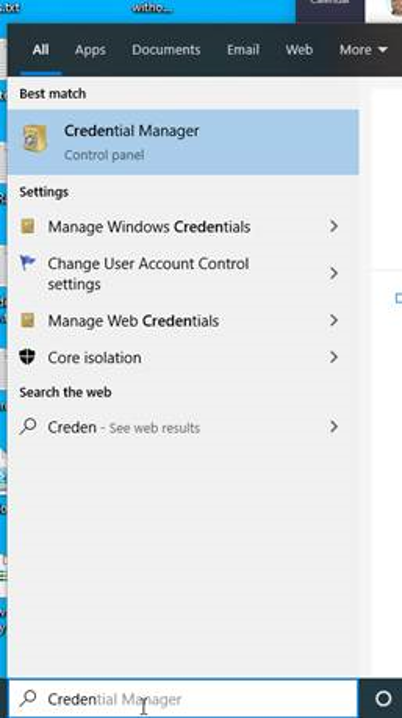
To do this, search for “Credential Manager” in your Windows 10 search bar.

Choose “Windows Credentials”

Then remove all the “msteams” credentials and reboot.

Azure AD Connect Deletion Scare

On September 10th, 2019, Microsoft released Azure AD Connect v1.4.

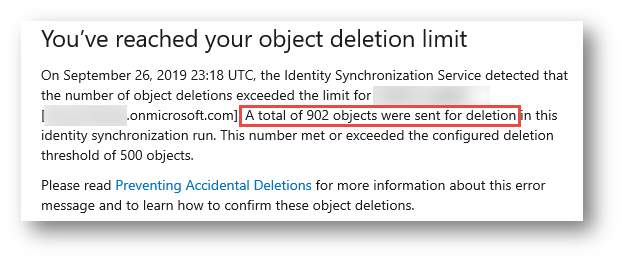
Customers that had configured their Azure AD Connect for auto-upgrade are now experiencing rolling upgrades, which can cause mass deletion of devices from Azure AD. One of my clients contacted me today after receiving a rather alarming and unsettling email about several hundred objects being deleted:

Their question to me was: “This is very concerning. Should I be worried or no?

My immediate response was “Call me ASAP!” – as I thought that someone had restructured their organizational units in Active Directory, which is a common cause of mass deletion of objects from Azure AD. As I waited for the remote sharing invite to arrive in m y inbox, I began formulating my plan: identify the OU that changed, go into AAD Connect and start syncing that OU again, and then on next full sync, it would restore all the soft deleted objects. I’ve done this before, so I was expecting to bring this issue to closure quickly… or so I thought.

After further investigation, we couldn’t find any evidence of OU changes. In fact, this customer followed best practice by not performing OU filtering (which avoids the problem of OU changes causing mass deletes).

Puzzled, I noticed that in the AAD Synchronization Service, the first instance of the mass delete event occurred as part of a FULL Sync. “Aha!” – I thought to myself, a full sync can only occur when a human is involved, so let’s track down who did this and have a chat. If left unprovoked, AAD Connect only runs Delta syncs every 30 minutes.

We quickly ruled out human involvement, as there was no evidence of any recent interactive logon.

The next thought that came to mind was a feature of AD Connect, called Auto Upgrade. We checked the Control Panel > Programs and noticed that AAD Connect was updated today. Aha! .. But why would the upgrade cause a mass deletion?

We then looked at the Azure AD release notes and noticed this explanation:

With this version of Azure AD Connect some customers may see some or all of their Windows devices disappear from Azure AD. This is not a cause for concern, as these device identities are not used by Azure AD during conditional access authorization. For more information see Understanding Azure AD Connect 1.4.xx.x device disappearnce

Then scrolling down to the Fixed Issues section we saw:

“Fixed a bug where non-Windows 10 computers were syncing unexpectedly. Note that the effect of this change is that non-Windows-10 computers that were previously synced will now be deleted. This does not affect any features as the sync of Windows computers is only used for Hybrid Azure AD domain join, which only works for Windows-10 devices.”

Fascinating. So this explained why we saw 900 objects attempt to be deleted, and upon verification, they were Windows 7 objects, and Windows Server objects.

SURPRISE…

Azure AD Connect will not permit more than 500 objects to be deleted, so that is why the warning email was sent. We surmised that the proper thing to do was to remove the deletion protection mechanism otherwise the AAD Connect would perpetually remain in an error-status, unable to delete all these devices itself.

So we ran these three PowerShell Commands on the AAD Connect Server:

Disable-ADSyncExportDeletionThreshold

Then we started a full sync:

start-adsyncsynccycle -policytype Initial

Then after watching the deletion finish in the Synchronization Service GUI tool, we re-enabled the deletion threshold:

Enable-ADSyncExportDeletionThreshold -DeletionThreshold 500.

Reference: https://docs.microsoft.com/en-us/azure/active-directory/hybrid/how-to-connect-sync-feature-prevent-accidental-deletes

Hopefully this helps! More information about this issue can be found here:

https://docs.microsoft.com/en-us/azure/active-directory/hybrid/reference-connect-device-disappearance

Like it or not – Guest Sharing now includes your Privacy Policy – or LACK of Policy

On June 18th Microsoft announced in the Office 365 Message Center (“MC182498”) that guest user invites will now include your organization’s privacy policy contact information to all external guest invites. This does not apply to you if you have disabled guest access.

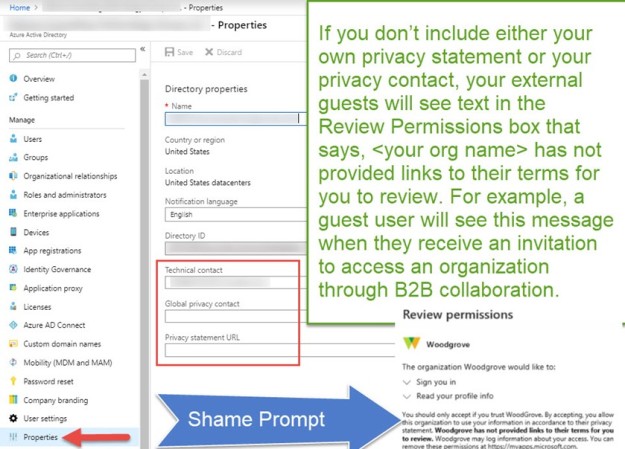
Sounds great but what if you don’t have privacy policies? Your new guests will receive a Shame Prompt as shown below.

Follow these instructions to update your organization’s privacy policy. https://docs.microsoft.com/en-us/azure/active-directory/fundamentals/active-directory-properties-area

Pro-Tip – You don’t need all three configured, you can get by with just the first two. Here is what it looks like when you only have the email address fields completed.

Note: If you have the data in Office 365, you can consider piggy-backing on the Microsoft Privacy Policy so you can defer to how Microsoft stores the data (run that by your Lawyer of course!).

https://privacy.microsoft.com/en-US/privacystatement

Otherwise, there is a free privacy template at the GDPR website here: https://gdpr.eu/wp-content/uploads/2019/01/Our-Company-Privacy-Policy.pdf

Top 10 Fixes for troubleshooting free/busy between Exchange on-premises and Exchange Online in Office 365

Free/busy often fails to work out-of-the-box after configuring Hybrid Exchange with Office 365. Here are my top ten fixes:


  1. Set the sharing policy to match on-premises and cloud.

    First, Connect to Exchange Online Remote Powershell and run get-sharingpolicy

    Then connect to on-premises Exchange Management Shell and run get-sharing policy

    Then make the two match on both sides.


Set-SharingPolicy -Identity SharingPolicy01 -Domains ‘contoso.com: CalendarSharingFreeBusySimple’, ‘atlanta.contoso.com: CalendarSharingFreeBusyReviewer’, ‘beijing.contoso.com: CalendarSharingFreeBusyReviewer’


  1. Set the organization relationship domains to include all accepted domains on both on-premises and cloud (always requires an IISRESET for it to take effect)
    This script helps identify missing domains in an existing relationship:


    if ( (Get-OrganizationRelationship).DomainNames -contains (Get-Mailbox user).PrimarySmtpAddress.Domain) { write-host “The domain was found” -ForegroundColor Green } else { write-host (Get-Mailbox user).PrimarySmtpAddress.Domain “was not found” -ForegroundColor Yellow}


    $OrgRel = Get-OrganizationRelationship Contoso

    $OrgRel.DomainNames += “contoso.com”

    Set-OrganizationRelationship $OrgRel.Name -DomainName $OrgRel.DomainNames


    1. If the autodiscover DNS name is not published in external DNS, and if the client doesn’t want to do that, then manually configure TargetSharingEpr to use the published EWS path

      Get-OrganizationRelationship -Identity “O365 to On-premises – (GUID)” | Set-OrganizationRelationship -TargetSharingEpr https://mail.contoso.com/ews/exchange.asmx

    4) For ‘401 errors’ try disabling the IOC connector in Exchange 2013 to have oAuth fall back to dAuth


    5) Sometimes it’s necessary to set the on-premises EWS virtual directory “WSSecurityAuthentication” value back to defaults (some clients change this if they do load balanced CAS)
    (this is commonly a last resort)

    Need to change WSSecurityAuthentication to False for EWS Virtual directory.

        a.       Set-WebServicesVirtualDirectory “Exch CAS\ews*” –WSSecurityAuthentication $false

        b.      Need to Stop MSExchangeServicesAppPool.

        c.       Need to Start  MSExchangeServicesAppPool.


      Need to change WSSecurityAuthentication to True again for EWS Virtual Directory.

        a.       Set-WebServicesVirtualDirectory “Exch CAS\ews*” –WSSecurityAuthentication $True

        b.      Need to Stop MSExchangeServicesAppPool.

        c.       Need to Start  MSExchangeServicesAppPool.


      Need to change WSSecurityAuthentication to False for Autodiscover Virtual directory.

        a.       Set-AutodiscoverVirtualDirectory “Exch CAS\Auto*” –WSSecurityAuthentication $false

        b.      Stop MSExchangeAutodiscoverAppPool.

        c.       Start  MSExchangeAutodiscoverAppPool.


      Change WSSecurityAuthentication to True again for Autodiscover Virtual Directory.

        a.       Set-AutodiscoverVirtualDirectory “Exch CAS\Auto*” –WSSecurityAuthentication $true

        b.      Stop MSExchangeAutodiscoverAppPool.

        c.       Start  MSExchangeAutodiscoverAppPool.


    6) If the Exchange Server is behind a web proxy then it is usually necessary to configure InternetWebProxy Set-ExchangeServer <Server Name> -InternetWebProxy:http://<Proxy Address>:<Proxy Port>


    7)  Verify the availability address space and see required SMTP domain with access method.

        Get-AvailabilityAddressSpace (Run this on-prem)


    8) Try running diagnostic commands:
    You can also use the Test-FederationTrust (on prem only) and Test-OrganizationRelationship  (run this both on prem and in cloud too)

    And you can also use this website to run tests: https://www.testexchangeconnectivity.com/

    9) Make sure that the cloud user you are searching for has a valid (tenant).mail.onmicrosoft.com alias on their target mailbox (make sure Azure AD Connect is properly replicating that attribute, and/or, that the Exchange Address Policy is not blocking inheritance on that particular user/object).


    10) Run these commands to gather diagnostic information:

    Onpremises:

    Start-Transcript

    Get-FederationTrust | fl

    Get-FederatedOrganizationIdentifier | fl

    Get-OrganizationRelationship | fl

    Get-WebServicesVirtualDirectory | Export-Clixml C:\temp\WebVdir.xml

    Get-AutoDiscoverVirtualDirectory | Export-Clixml C:\temp\AutoDVdir.xml

    Get-RemoteMailbox bobc_sync | fl

    Get-Mailbox “on-premises John Doe User” | fl

    Test-FederationTrust -UserIdentity [email protected] | fl

    Test-FederationTrustCertificate | fl

    Get-IntraOrganizationConnector | fl

    Stop-Transcript


    Online:

    Start-Transcript

    Get-FederationTrust | fl

    Get-FederatedOrganizationIdentifier | fl

    Get-OrganizationRelationship | fl

    Get-MailUser “on-premises John Doe User” | fl

    Get-Mailbox “Cloud user” | fl

    Get-IntraOrganizationConnector | fl

    get-OrganizationRelationship | Test-OrganizationRelationship -UserIdentity “cloud user”

    Stop-Transcript


    And when all else fails I reference these two blog articles:

    https://blogs.technet.microsoft.com/exchange/2018/02/06/demystifying-hybrid-freebusy-what-are-the-moving-parts/

    and 

    https://blogs.technet.microsoft.com/exchange/2018/03/02/demystifying-hybrid-freebusy-finding-errors-and-troubleshooting/

How to fix Exchange Online Hybrid Outbound Connector 454 4.7.5 Certificate Validation Failure

While recently helping a client setup an Exchange Hybrid, the cloud to on-premises mail flow was failing validation due to 454 4.7.5 Certificate Validation Failure.

The next step was to verify that the TlsCertificateName value was properly set on the send and receive connectors to match the certificate name, following these articles:

https://blogs.technet.microsoft.com/lalitbisht/2017/06/03/mailflow-issue-from-exchange-on-prem-to-office-365/

https://practical365.com/exchange-server/configuring-the-tls-certificate-name-for-exchange-server-receive-connectors/

In this case, the TlsCertificateName was already set correctly to match the certificate name (the Hybrid Exchange Wizard does a good job at setting that correctly).

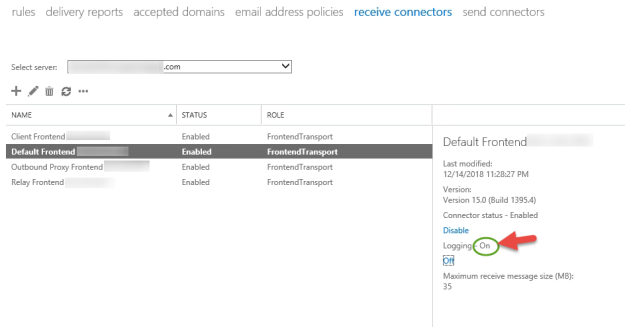
The next step was to enable Verbose logging on the on-premises receive connector so that we can get a better look at the error.

To save time, I restarted the “Microsoft Exchange Frontend Transport” service so that the logging would take effect sooner.

Then navigating to the log directory can be a bit tricky:

C:\Program Files\Microsoft\Exchange Server\v15\TransportRoles\Logs\FrontEnd\ProtocolLog\SmtpReceive

Opening up the file revealed a very helpful bit of information! The SSL Certificate that Microsoft Office 365 is presenting to the Exchange server for the TLS encrypted email is not a trusted root. How can this be?


To cut to the chase, the root cause was that the server had not had windows updates run in a LONG time and therefore was really far behind in its root certificates.

The least disruptive solution was to download the Office certificate chains from Microsoft (here) and install them on the on-premises Exchange Server. Then after restarting the “Microsoft Exchange Frontend Transport” service and waiting a few minutes, the validation was successful.

Passwordless phone sign-in with the Microsoft Authenticator app – not compatible with conditional access require approved client app

This blog post details the effort to enable passwordless phone sign-in to Azure Active Directory using the Microsoft Authenticator App. Last week Microsoft announced this capability on September 26th at the Ignite Conference.

In my environment, I had to first install the Azure AD PowerShell preview module:

Install-Module -Name AzureADPreview -RequiredVersion 2.0.0.114

The first error I got reminded me that I had to run it in an elevated PowerShell window.

The second error I received informed me that there were already existing commands available:

“PackageManagement\Install-Package : The following commands are already available on this system: [Insert a TON of commands] followed by “This module ‘AzureADPreview’ may override the existing commands. If you still want to install this module ‘AzureADPreview’,use -AllowClobber parameter.”

In my case, it errored out because I had previously installed the production Azure AD PowerShell module, so I added the -AllowClobber to the end like this:

Install-Module -Name AzureADPreview -RequiredVersion 2.0.0.114 -AllowClobber

The next thing to do is to connect to Azure AD:

Connect-AzureAD

Then run this command:

New-AzureADPolicy -Type AuthenticatorAppSignInPolicy -Definition ‘{“AuthenticatorAppSignInPolicy”:{“Enabled”:true}}’ -isOrganizationDefault $true -DisplayName AuthenticatorAppSignIn

You can now run a get-AzureADPolicy to see the same information above. This would be a way to check to see if another tenant admin already beat you to the task =)


End User Steps


End-users need to enable sign-in on their Microsoft Authenticator App as described here: https://docs.microsoft.com/en-us/azure/active-directory/user-help/microsoft-authenticator-app-phone-signin-faq


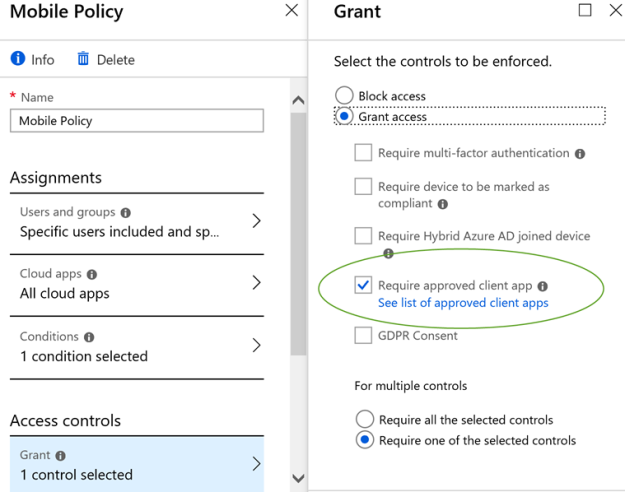
I immediately hit a roadblock where the Authenticator App was ironically blocked by our Conditional Access Policy which requires only approved client apps.


Very strange that Microsoft’s own Authenticator app is not an approved client app.

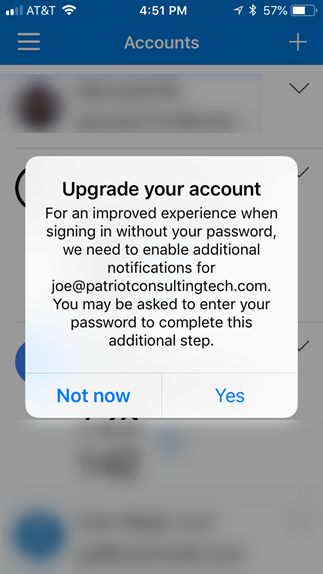
Another tell-tale sign that something was wrong was I had an exclamation point next to the account inside the Authenticator app.

So I then excluded myself from that policy and continued setup. I had to select an option in the Authenticator app to update phone sign-in.


This worked and then I was able to test the passwordless sign-in successfully. The web page will give you a number, and then you go back into the authenticator app and you select the number from three options.

If you are wondering why 77 is not in the list of three options below, it’s because I didn’t time the screen shot correctly =)

Therefore, I think Microsoft should update the known issues list to include this problem that existing Conditional Access Policies may block the passwordless sign in from working properly.

I also added a UserVoice request to have Microsoft Authenticator added to the list of approved client apps. Kind of funny that this isn’t approved already, but hey, please vote!

https://feedback.azure.com/forums/169401-azure-active-directory/suggestions/35605771-add-microsoft-authenticator-to-approved-client-app

So unfortunately, because our organization relies upon the ‘require approved client app’ to block unsavory apps, we needed to roll back this change.

Rollback Tenant

Get-AzureADPolicy | Remove-AzureADPolicy

Rollback all enrolled Authenticator apps

I discovered that rolling back the tenant was not enough. I also had to remove my O365 account from inside the Authenticator app on my mobile device. I assume when my account was upgraded to Phone sign-in, it must have altered it beyond repair. So I went into the Authenticator App accounts and removed the account, and then re-enrolled it by going to http://aka.ms/MFASetup. Finally, I was able to get back in.

So now that I have tasted how cool passwordless sign-in, I would really like to use it, but will need to wait until it is compatible with the ‘require approved app’ conditional access feature.

References:

https://docs.microsoft.com/en-us/azure/active-directory/authentication/howto-authentication-phone-sign-in


Azure Conditional Access and Azure AD Connect Service Account

If you deploy an Azure Conditional Access policy to require all Windows PC’s to be domain joined, you may find that Azure AD Connect no longer synchronizes.

And during an upgrade to the latest version of Azure AD Connect, you may be prompted with the error message “System.InvalidOperationException: Showing a modal dialog box or form when the application is not running in UserInteractive mode is not a valid operation.”

To resolve this, modify the conditional access policy to exclude the Azure AD Connect Service Account, which can be found by searching for “On-premises directory synchronization service account”

Then create a second conditional access policy that is targeted this same on-prem account with a condition exclusion for all trusted locations, and a block rule for all other access. This effectively creates an IP-Fence that prevents this service account from logging in from anything other than the trusted location.

Office 2016 and older clients will not connect to Office 365 after 10/13/2020

Now that Office 2019 is in beta/preview, it may be wise to start planning deployment now because after October 13th 2020, Office 365 ProPlus 2016 and older clients will be actively blocked from connecting to Office 365 services. Only Office 365 ProPlus 2019, or Office perpetual clients within mainstream support can connect to Office 365 services.

https://www.microsoft.com/en-us/microsoft-365/blog/2017/04/20/office-365-proplus-updates/

Actively blocking older clients is a major change in policy compared to the current policy which states “Previous versions of Office, such as Office 2010 and older clients may work with Office 365 with reduced functionality” https://products.office.com/en-US/office-system-requirements


20 Things to do before and after a phishing event in Office 365

Statistics indicate that 20% to 50% of corporate users will give away their username and password when asked to do so by a social engineer (for example through a phishing email).

50% to 70% of corporate users admit to recycling their password across multiple websites. Users will memorize no more than 5 unique passwords, and then they start to increment numbers on the end. Then when these websites are hacked, the passwords can be put into credential stuffing tools like SNIPR to see what websites those passwords can be used on.

Some of the more clever and convincing phishing emails originate from a trusted person such as the CEO, HR Department, IT Department, or even Microsoft. The HR Department example might say “you have received an encrypted message from HR” and if you click on the link to view the message, it steals your O365 password. The attacker then logs into your account, forwards your email to them, and then send emails out to your customers or other colleagues to continue to propagate.

Here are a few tips on how to prepare for when this happens to you.

  1. Be prepared to Reset the affected user’s password right away. Note that if you reset the password on-premises, it can take a few minutes before that password change is synced to Office 365 (if you are using Password Hash Sync, it can take 3 to 4 minutes). If you are using ADFS or AAD PTA then there is no delay.
  2. Document the steps to revoke an active user’s session in Office 365, forcing them to try to logon with the new password. There are five supported methods, but in my testing I get mixed results on how quickly they take effect. For example, on a mobile device that previously authenticated with an MFA token for ActiveSync, none of the below methods seem to immediately invalidate the MFA token. Fortunately, most account takeovers in O365 are browser-based, so this shouldn’t be a problem to proceed with any of the options below.
    Option 1) Reset the user’s password. This will invalidate the current token.
    Option 2) In Azure AD remote powershell:
    $RefreshTokensValidFrom = Get-DateSet-MsolUser UserPrincipalName <UPN of the User> –StsRefreshTokensValidFrom $RefreshTokensValidFrom

    Note StsRefreshTokenValidFrom will appear to accept any date, but it will always set to the current date and time.

    Option 3) [Only applies if the user uses OneDrive] From the Office 365 Admin Center under Home > Active Users. Select a user and expand the OneDrive Settings section for that user. Select “Initiate” to perform a one-time sign-out for that user that revokes active sessions across Office 365 services including Exchange Online.
    Option 4) Force logoff during an active user session in Office 365 to use Revoke-SPOUserSession cmdlet from the SharePoint Online PowerShell Module. This method is helpful for automating security incident response flows or when there is a need to revoke multiple users’ sessions.
    Option 5)  Revoke-AzureADUserAllRefreshToken cmdlet is available in the AzureAD V2 PowerShell Module and expires a user’s refresh token by modifying the user’s token validity period”
    Reference: https://blogs.technet.microsoft.com/educloud/2017/06/14/how-to-kill-an-active-user-session-in-office-365/

  3. Deploy Multi Factor Authentication on targeted users, privileged users, and users who access sensitive information. Many people do not know that O365 includes free MFA without the need for additional licenses.. it comes built into all O365 plans. Make sure you read the MFA Best Practices blog post here.
  4. Check to see if mailbox forwarding was enabled, and if so to who (document the external addresses to verify the validity).
    Here is a great one-liner to run in Exchange Online Powershell:
    get-mailbox -resultsize unlimited |where {$_.ForwardingSmtpAddress -ne $null} | select displayname,forwardingsmtpaddress
  5. Check message trace logs in Exchange Online Admin center (http://outlook.com/ecp) to see what items were sent to suspected unauthorized external accounts.
  6. Prior to January 1st, 2019, Mailbox Auditing was disabled by default in Exchange Online. Microsoft began enabling it but in early 2019 they paused the audit of a particular action that was formerly known as MessageBind (deprecated 1/23/2019) with the renamed event MailItemsAccessed event, which tells you which emails the owner, delegate or administrator may have accessed. Tony Redmond wrote (here) that the rollout of this action will resume October 2019, per Message Center “MC193448”. At Ignite 2019 conference, it was announced that MailItemsAccessed would be included in ‘Advanced Auditing’ which is an E5 licensed feature. As of February 6th 2020, our tenant still shows no signs of this feature even though we have E5 licenses.
  7. Review Azure Reports on a frequent basis. Note that detailed reports are not available with Azure AD Free, and require Azure AD Premium P1.
    1. Risky Sign-Ins
      1. Sign-ins from anonymous IP addresses
      2. Impossible travels to atypical locations
      3. Sign-ins from infected devices
    2. Users flagged for risk
    3. Azure Sign In Logs (Requires P1) at portal.azure.com
    4. Office 365 Audit Logs at protection.office.com or soon to be security.microsoft.com
  8. Use Message Trace to see who received emails from the attacker’s email address.
  9. Use ATP URL Trace to view who clicked on the hyperlink sent from the attacker.
  10. Purge the email with PowerShell for any user who has not yet clicked on the email sent from the attacker.
    There are two ways of doing this, and one is significantly faster than the other.
    Method #1 is the traditional method and uses Search-Mailbox like this:
    Get-Mailbox  -ResultSize unlimited | Search-Mailbox -SearchQuery {Subject:“Urgent Memo from CEO” And received:05/31/2018..06/01/2018} -DeleteContent -Force
    Note: You have to be assigned the Mailbox Import Export management role to use the DeleteContent switch.
    Tip: gather what would be deleted first with this command: Search-Mailbox -Identity [email protected] -TargetMailbox [email protected] -TargetFolder Case1234 -SearchQuery “Subject:Click Here to get a Virus”

    Method #2 is newer and is a LOT faster.
    Search in the compliance center, export the result for evaluation (optional), then proceed with connecting to Exchange Online remote PowerShell and running these two commands (replacing with the search name you used in the compliance center).
    Get-ComplianceSearch -Identity “My Bad Virus”
    New-ComplianceSearchAction -SearchName “My Bad Virus” -Purge -PurgeType SoftDelete

  11. Cloud App Security is valuable for many reasons, but it extends the auditing to 180 days whereas the built-in audit logs in the Office 365 Security and Compliance Center only go back 90 days.
    Licensing: CAS is available in two forms, O365 E5 or EMS E5… the former protects mostly O365 and 750 other SaaS apps, whereas the later protects 15,000 SaaS apps and supports automatic log uploads from your on-premises firewalls.
  12. Office 365 Threat Intelligence (an E5 feature) can identify who your top targeted users are and alert you when there are active email campaigns going on so that you can alert your users of the threat.
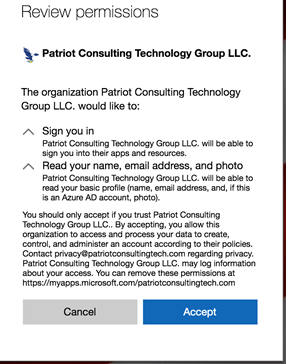
  13. Consider Disabling User Consent to 3rd party applications in Azure Active Directory. This prevents users from granting consent to 3rd party apps that may be the next wave of ransomware, that encrypts mailboxes. There is a new capability that allows Admins to approve apps that users request. A proof of concept was recently demonstrated on the internet. Review existing oAuth grants.
  14. Deploy ATP Anti-Phishing. For more details: https://support.office.com/en-us/article/Set-up-Office-365-ATP-anti-phishing-policies-5a6f2d7f-d998-4f31-b4f5-f7cbf6f38578
  15. Disable Legacy Authentication (This will be turned off October 2020, so might as well do it now)
    For more information on this, read the MFA Best Practices blog post here.
  16. Disable POP/IMAP for future mailboxes and current mailboxes
    Examples:
    #All Future Mailboxes
    Get-CASMailboxPlan | set-CASMailboxPlan -ImapEnabled $false -PopEnabled $false
    #All Existing Mailboxes:
    get-casmailbox | set-casmailbox -imapenabled $false -PopEnabled $false
  17. Disable SMTP Auth at the global level or mailbox level. This prevents users from using this as a brute force vector.
    #Global Level
    Set-TransportConfig -SmtpClientAuthenticationDisabled $true
    #Mailbox Level
    Get-casmailbox -resultsize unlimited | Set-CASMailbox -SmtpClientAuthenticationDisabled $true
  18. Disable user’s powershell access in Exchange Online, ex:
    get-user | set-user -RemotePowerShellEnabled $false
    #Don’t lock yourself out – use the where clause to exclude your account.
  19. Check Inbox rules and Delegate access in Exchange Online. For example, get-inboxrule -mailbox [email protected]
    Single User:
    Get-InboxRule -Mailbox [email protected] | where {$_.redirectTo -ne $null} |select mailboxownerid,redirectto,description
    Multiple Users:
    get-mailbox -resultsize unlimited |%{Get-InboxRule -Mailbox $_.userprincipalname} | Where-Object {($_.ForwardTo -ne $null) -or ($_.ForwardAsAttachmentTo -ne $null) -or ($_.RedirectsTo -ne $null) |select mailboxownerid,redirectto,description |Export-Csv .\inboxrules.csv -NoTypeInformationNote: For large organizations, this script can sometimes timeout, so you may need to incorporate a counter logic like I created in this other script I published on the TechNet gallery (here).

    ** TBD: Repeat the command above for any rule content where the RSS Subscriptions folder is mentioned. Note: Microsoft’s Cloud App Security has a rule to detect for malicious inbox rules like this.

    Here is the script to check for delegates:
    https://github.com/OfficeDev/O365-InvestigationTooling/blob/master/DumpDelegatesandForwardingRules.ps1

    Microsoft has a new report to show all SMTP and Inbox Forwards https://protection.office.com/reportv2?id=MailFlowForwarding&pivot=Name

Tips:

  • Deploying MFA should be the first priority because if a user gives away their credentials, then the attacker cannot access the mailbox to do further damage.
  • Many people ask me how to view reports of who has or who has not been enabled for MFA. There are not GUI reports available for this in O365, so I wrote some PowerShell scripts at the bottom of this blog post to help you enumerate those scenarios.
    Hint: It is highly recommended to enable oAuth first (via PowerShell) so that users are not prompted to use ‘MFA App Passwords)
    oAuth is off by default in Exchange Online and Skype for Business Online. It is ON by default in SharePoint and OneDrive. For more info see:
    https://social.technet.microsoft.com/wiki/contents/articles/32711.exchange-online-how-to-enable-your-tenant-for-modern-authentication.aspx

    And
    https://social.technet.microsoft.com/wiki/contents/articles/34339.skype-for-business-online-enable-your-tenant-for-modern-authentication.aspx

  • Disabling mailbox forwarding is important because in the most recent incidents, the attacker will forward the mailbox to an outside email address and monitor for a while before initiating emails to customers or other employees.
  • Enabling auditing in Exchange Online is important, because by default auditing mailbox activity is disabled. But enabling it is not as easy as you would think – you have to be specific on what actions you want to audit, so I have included examples below.
  • Reviewing the Azure reports is important because they will indicate whether a user’s mailbox is being accessed by an unusual or distant IP address. This is often how you will find out that an account has been compromised.

Exchange Online Mailbox Auditing 101

get-mailbox | group-object AuditEnabled

This command will give you a quick and high level picture of how many accounts have Auditing enabled.

get-mailbox -resultsize unlimited | set-mailbox -AuditEnabled $true -AuditLogAgeLimit 180

This command will enable mailbox auditing on all accounts and increase the default audit level from 90 to 180

The following commands will show you the default auditing settings on a single mailbox user “Joe”

get-mailbox joe | select -ExpandProperty auditadmin

get-mailbox joe | select -ExpandProperty auditowner

get-mailbox joe | select -ExpandProperty auditdelegate

Prior to 2/1/2019, The Mailbox Owner auditing only logs a single event by default: MailboxLogin. After 2/1/2019, additional events are logged unless this has been customized.

Therefore, to enable the maximum level of auditing that you can for a mailbox owner, here is the command:

get-mailbox -ResultSize unlimited | set-mailbox -AuditOwner @{Add=”create”,”HardDelete”,”MailboxLogin”,”Move”,”MoveToDeletedItems”,”SoftDelete”,”Update”,”UpdateFolderPermissions”,”UpdateInboxRules”, “UpdateCalendarDelegation”}

Similar commands can be run for AuditDelegate and AuditAdmin.

References:

https://support.office.com/en-us/article/enable-mailbox-auditing-in-office-365-aaca8987-5b62-458b-9882-c28476a66918#ID0EABAAA=Mailbox_auditing_actions

MFA Reporting

The MFA reporting in Office 365 is almost non-existent. You need to go to powershell to audit who has been enforced, enabled or is not yet enabled.

  1. Enabled (Means the user has been enabled but they have not yet completed MFA registration)

Get-MsolUser -All | where {$_.StrongAuthenticationRequirements.state -eq ‘Enabled’ } | Select-Object -Property UserPrincipalName,whencreated,islicensed,BlockCredential | export-csv enabled.csv -noTypeInformation

  1. Enforced (The user has completed MFA registration, so their account is not protected by MFA)

Get-MsolUser -All | where {$_.StrongAuthenticationRequirements.state -eq ‘Enforced’ } | Select-Object -Property UserPrincipalName,whencreated,islicensed,BlockCredential | export-csv enforced.csv -noTypeInformation

  1. Not Yet Enabled (These users have not yet been enabled for MFA)

Get-MsolUser -All | where {$_.StrongAuthenticationMethods.Count -eq 0 -and $_.UserType -ne ‘Guest’} | Select-Object -Property UserPrincipalName | export-csv non-enabled.csv -noTypeInformation

There is a great script that tells you exactly which type of MFA preference that users have set for themselves (ex: SMS vs Authenticator App). You can download that script from here.

Need Help?

Patriot consulting offers many security services for Office 365 including deploying any of the security solutions you read about in this article. We can also do a full audit of your Office 365 environment and make recommendations to harden the security. We also offer incident response services after you get phished. Contact us at [email protected]