Author Archives: Joe Stocker

What happened to the Email Security Funnel Reports?

Don’t feel bad if you missed the September 20th 2021 blog post titled “Improving the reporting experience in Microsoft Defender for Office 365

To be clear, most of us only have time to read about user impacting things where features are being taken away as that typically draws our attention. So when we read a headline like this, we may put it on the backburner until we have time to get to it later.

Then comes the day when you start looking for your favorite report and you can’t find it! It’s missing!

image

Yes, Microsoft has retired SIX reports: the malware email detection report, the spam report, the safe attachment file types, and deposition report, the sent and received email report, and the URL trace report that previously lived in the exchange admin center.

But as bad as that sounds, it’s actually not that bad at all. Why? Microsoft has replaced the reports with new and better reports, you just need to know where to go look for it. Basically the Funnel Report has been replaced with a newer and more modern “Sankey” report.

https://security.microsoft.com/mailflowStatusReport?viewid=sankey

clip_image002

The report is interactive, so if you click on ‘impersonation’ it will expand like this:

clip_image002[5]

The other benefit of the new report over the old one is the filtering capability is significantly more robust.

“In order for SecOps to focus the scope of their assessment with a lot more granularity, we are providing security professionals the ability to filter data by organization domain, policy type and name, priority account user tag, recipient address and email directionality (inbound and outbound).”

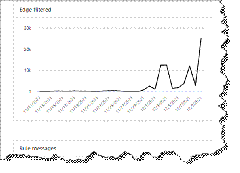
The new report also has a cool new ‘trendline’ flyout report that appears on the right after clicking on ‘show trends’

clip_image004

clip_image006

Here is the documentation page describing all the new features and capabilities of the new report. What’s really helpful about the documentation is it describes that of the 6 reports that have been retired, it tells you the hyperlinks of how to find the information in the new reports!

https://docs.microsoft.com/en-us/microsoft-365/security/office-365-security/view-email-security-reports?view=o365-worldwide#mailflow-view-for-the-mailflow-status-report

Other benefits: PowerBI and reporting API integration, and data going back > 90 days. <- This is huge.

Summary

Yes, change is hard sometimes when you get used to going somewhere and then a blog article gets posted, you miss it, and now you cannot find your data. Normally, Microsoft adds banners inside the product letting you know that a dashboard is coming or you have 30 days to enjoy it before its gone, so I am not sure why that did not happen in this case, but I am sure we can all agree the new reports are better and we will all enjoy the 90 day + increased historical data that the reports will pull, increased filtering, better details and drill downs, etc.

Conditional Access Policy to Block Non-Compliant Devices

Recently came across a scenario where we needed to block access to everything in Azure Active Directory (AAD) for non-compliant devices. Setting up that Conditional Access (CA) Policy was not a problem. The problem was it worked too well, and it even blocked the ability to register new devices into Intune for them to get the appropriate compliance policies.

Here is the error we were receiving when trying to enroll devices:

clip_image002

Based upon this denial of access error we knew that the policy was too strict, and we needed to allow for enrollment of new devices to get compliant. We went back into our policy that was set to block all cloud apps and excluded Microsoft Intune Enrollment.

After saving the policy we then went into testing mode and then got this:

clip_image003

SAME ERROR!!!!!

We then investigated into the Microsoft documentation to try and find more information about Intune Enrollment and CA Policies. We stumbled upon this link that breaks down the steps required to configure a CA Policy for Intune enrollment with Multi-Factor Authentication (MFA)

https://docs.microsoft.com/en-us/mem/intune/enrollment/multi-factor-authentication

We do have MFA turned for our users in this environment, but this article only highlighted using the Microsoft Intune Enrollment app for MFA at enrollment. Our policy to block access was at least allowing for the MFA prompt to occur, but not enrollment. This example policy also is not blocking any other apps, just requiring MFA for the Windows Intune Enrollment app.

In the document we notice it mentioned another Intune app – called Microsoft Intune

clip_image005

Searching for Microsoft Intune will yield a plethora of information, but we needed the details on the cloud app. We then searched for the cloud app we found this link that identifies all the cloud apps available for CA Policies.

https://docs.microsoft.com/en-us/azure/active-directory/conditional-access/concept-conditional-access-cloud-apps

Scrolling down it does list Microsoft Intune – but it has no link for more information on what it does! Microsoft Intune Enrollment is listed, and linked, but that link goes back to our MFA CA Policy link we from earlier!

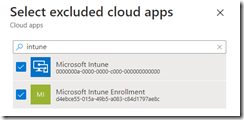
Now that its all clear as mud, and we had to try something, we decided to also exclude Microsoft Intune as well as Microsoft Intune Enrollment. All cloud apps were still selected, and block access was still the condition.

clip_image007

Then select the two Intune Apps – Microsoft Intune Enrollment AND Microsoft Intune

clip_image009

We then tested again, and ENROLLMENT WAS SUCCESSFUL! By adding those two apps as exclusions the Policy blocks access to all non-compliant devices but still allows for new devices to enroll. This meets the need for this situation as we needed to block all non-compliant devices from accessing anything, but also giving them an opportunity to become compliant by registering with the tenant.

Let us know in the comments section if this helps or if you have another way of blocking access while allowing enrollment.

Thanks for reading!

Security Concerns with Windows 365–aka Cloud PC

Cloud PC (sold as the Windows 365 Product SKU) is the latest Virtual Desktop service hosted by Microsoft in Azure. This post (Part 1) documents some of the security concerns that Infosec Twitter has identified. Part 2 will explore ways to harden CloudPC/Windows 365.

Cloud PC (Announced 7/14/2021 and Generally Available 8/2/2021)

Azure Virtual Desktop (Announced 6/7/2021) 

Windows Virtual Desktop (9/30/2019)

Azure RemoteApp (Retired on 8/31/2017)

Rand Morimoto wrote a nice write-up on Cloud PC (here), and the differences between it and Azure Virtual Desktop (here). Indeed, many have written articles on it, but the reason for this blog post is to examine the security and respond to some of the harsh criticism on Twitter (the InfoSec community on Twitter is probably the best ‘accountability’ buffer to keep Microsoft in check).

Most of what I have written about securing AVD/WVD (Part 1) and (Part 2) applies equally to Cloud PC. But what I love most about the business edition of Cloud PC is it eliminated all the overhead associated with spinning up the AVD/WVD environment (see Part 1 above to appreciate that effort). The Enterprise Edition requires some additional work but not as much as AVD/WVD, as explained in this Mechanics video here. There are already troubleshooting articles on the Hybrid Azure AD requirements here.

When I created my first Cloud PC, the provisioning process failed. I found out that there were issues with provisioning as described in the forums here. Turns out there were multiple issues and so I have published a separate blog post ‘Troubleshooting Windows 365 business’ here].

As an end user, you access your Cloud PC from: https://windows365.microsoft.com/

Also, it’s worth noting that on August 15th 2021, Microsoft is making Cloud PC available for end users to purchase on their own credit cards. IT Departments can disable this with PowerShell.

Install-module MSCommerce

Connect-MSCommerce

W365 Enterprise – update-MSCommerceProductPolicy -PolicyId AllowSelfServicePurchase -ProductId CFQ7TTC0HHS9 -Enabled $false

W365 Business/w Hybrid Benefits – update-MSCommerceProductPolicy -PolicyId AllowSelfServicePurchase -ProductId CFQ7TTC0J203 -Enabled $false

W365 Business – update-MSCommerceProductPolicy -PolicyId AllowSelfServicePurchase -ProductId CFQ7TTC0HX99 -Enabled $false”

Learn More: Use AllowSelfServicePurchase for the MSCommerce PowerShell module | Microsoft Docs

So why has Twitter been so unforgiving?

1. InfoSec Twitter does not like the default configuration of Local Administrator rights being given to the Cloud PC user. They claim this is not “secure by default.” It’s hard to argue with them on this point.
(1) Benjamin Delpy on Twitter: “Windows 365 is expensive and without basic security Did #mimikatz dumped my Azure *cleartext* password here? Or my Primary Refresh Token? It’s funny how you don’t apply best practices you recommend to the customer to avoid securing by default &gt; https://t.co/Wzb5GAfWfd https://t.co/cMDq1a4l5e” / Twitter
It does appear Microsoft is exploring solving this according to this thread here:
Windows 365 Business Cloud PC Local Admin – Microsoft Tech Community

2. Mimikatz has been updated to dump Windows 365 credentials

(1) Benjamin Delpy on Twitter: “After a little bug report from @LawrenceAbrams, I just pushed a #mimikatz fix to dump even more #Windows365 credentials privilege::debug ts::logonpasswords &gt; https://t.co/HjfZej6tqD” / Twitter

and

(1) Benjamin Delpy on Twitter: “Would you like to try to dump your #Windows365 Azure passwords in the Web Interface too? A new #mimikatz release is here to test! (Remote Desktop client still work, of course!) &gt; https://t.co/Wzb5GAfWfd cc: @awakecoding @RyMangan https://t.co/hdRvVT9BtG” / Twitter

3. Lack of SecureBoot, UEFI, Credential Guard, etc
(1) Benjamin Delpy on Twitter: “Figure 1. VM with hardware enforced security, vTPM, SecureBoot, UEFI, Credential Guard, etc. Figure 2. #Windows365 without basic hardware security, no security feature, BIOS Guess the one running on an old ESXi in basement vs the new 365 revolution from Microsoft in #Azure ? https://t.co/PUGtqO0g3s” / Twitter

Disable Exchange Online Remote PowerShell for users as a scheduled task

This PowerShell script can run unattended as a scheduled task and will enumerate the global administrators, then remove remote PowerShell access for any user who is not a global administrator.

#See Prerequisites section below to create these two certificate connection scripts below

Invoke-Expression -Command C:\scripts\connect-certificate.ps1

Invoke-Expression -Command C:\scripts\connect-azureadcertificate.ps1

$GlobalAdmins = Get-AzureADDirectoryRoleMember -ObjectId $(Get-AzureADDirectoryRole -filter “displayname eq ‘Global Administrator'”).ObjectID

$AllUsers = get-user -resultsize unlimited

$UserswithPowerShell = $AllUsers | where {$_.RemotePowerShellEnabled -eq $true}

$UsersWhoAreNotGlobalAdmins = $UserswithPowerShell | where {$_.userprincipalname -notin $GlobalAdmins.userprincipalname}

$counter = ($UsersWhoAreNotGlobalAdmins).count
$current = 1

if ($UsersWhoAreNotGlobalAdmins) {
write-host “Users who currently have remote powershell access” ($UserswithPowerShell).count
foreach ($user in $UsersWhoAreNotGlobalAdmins) {
write-host “Removing PowerShell access from user ” $current ” of ” $counter “(” $user.userprincipalname “)”
set-user -identity $user.userprincipalname -RemotePowerShellEnabled $false

#Optional, the next statement can also apply a authentication policy to block basic auth

#Set-User -identity $user.userprincipalname -AuthenticationPolicy “Block Basic Auth”
$current = $current + 1

}
}
else
{
write-host “there are no non-global admin users with PowerShell access”
}

Download the script (here).

Prerequisites: Create two Azure AD Applications (1) Exchange and (2) Azure AD

TIP: When creating the Scheduled Task,  the account must have the Logon as a service right assigned. Then the ‘action’ to start a program points to c:\windows\system32\windowspowershell\v1.0\powershell.exe
then the arguments are: -File “c:\scripts\scriptname.ps1”

Securing Windows Virtual Desktop (2 of 2)

This is part 2, to learn how to setup a lab for WVD see part 1.

The first rule of securing WVD is to block all internet ports to the WVD infrastructure. You should not open TCP 3389 because Windows Virtual Desktop doesn’t require any open ports for users to access the host pool’s VMs. WVD uses Reverse Connect, which reduce the risk involved with having remote desktops brute forced from the internet.

The second rule of securing WVD is to enable MFA. Otherwise, if an attacker knows the email address, brute force is possible (or easier if the attacker obtains the password from a data breach since most users recycle their passwords). The location of the WVD environment is not a secret since most organizations will publish a deterministic TXT record that is always in the format of _msradc.(domain.com), like _msradc.contoso.com.

So security for WVD is similar to how we secure other M365 applications such as Exchange Online, SharePoint Online, Teams, OneDrive for Business, etc.

Identity Best Practices for WVD

1. Implement MFA for WVD.

Prerequisites:

a. Azure AD Premium P1 license is applied to the user accessing WVD

b. The user has previously enrolled into Azure AD MFA. (http://myprofile.microsoft.com)

c. Create a conditional access policy that targets the WVD application
Windows Virtual Desktop (App ID 9cdead84-a844-4324-93f2-b2e6bb768d07)

(If you are using the older WVD Classic (early adopters of WVD) then there is a different application you will select, learn more here.

2. Setting Expectations for the user’s MFA experience. For devices that authenticate with MFA at least once, they receive a token that allows the user to avoid additional (and arguably unnecessary) MFA prompts since they have already proven they are not a hacker. Some organizations still require MFA prompts for every single authentication attempt. The closest to that requirement is to set the CA Session refresh timeout to 1 hour (that is the minimum), which will require multifactor authentication if a connection is launched an hour after the last one. To configure this go to the Conditional Access policy created in step 1 and then select Session, select Sign-in frequency, set the value to the time you want between prompts. 

3. Use IP Fencing (sparingly). For example, if the outside vendor that needs to access your WVD environment always connects from a specific static IP address, you could create the conditional access policy to block access to WVD from any IP address other than the permitted IP address ranges. This scales reasonably well even for large organizations since you can have 2,000 IP ranges per named location (and a max of 195 total named locations).  This works mostly for businesses because most people’s home ISP will rotate the IP address periodically.

Disable Redirections

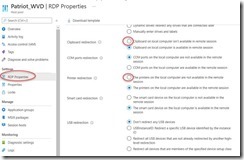
To prevent data from being copied outside of the WVD VM you can disable some of the redirections such as Clipboard and local drive access.

You can do this in the GUI or in PowerShell.

clip_image002

To learn how to connect with PowerShell, click here.

For example:

· redirectclipboard:i:0 disables clipboard redirection.

· usbdevicestoredirect:s: disables USB device redirection.

· devicestoredirect:s: disables redirection of plug and play devices.

· drivestoredirect:s: disables local drive redirection.

· redirectprinters:i:0 disables printer redirection.

To learn more about customizing RDP properties for a host pool using PowerShell or the Azure portal, check out RDP properties. For the full list of supported RDP properties, see Supported RDP file settings.

Block Screen Capture

The WVD client for Windows 10 has a unique feature that can prevent the host machine from taking screen shots of the applications running inside the WVD. This is done by adding a registry key to the WVD host computer in azure that is hosting the virtual machines. Since only the Windows client supports this, you could create a conditional access policy that prevents other operating systems from connecting to WVD (block mac, mobile and browser clients).
reg add “HKLM\SOFTWARE\Policies\Microsoft\Windows NT\Terminal Services” /v fEnableScreenCaptureProtection /t REG_DWORD /d 1
Learn more here.

RemoteApps vs Full Desktop

Publish RemoteApps rather than the full desktop. If you publish applications instead of the desktop then you don’t need to worry as much about data exfiltration. If you must publish a full desktop then you may want to look into Endpoint DLP for Windows 10 (requires M365 E5 license, Microsoft 365 E5 compliance, or Microsoft 365 E5 information protection and governance). This is likely to work on the WVD Dedicated but may not the WVD multi-session pooled configuration (I’ll have to test that).

Securing Azure AD Domain Services

In many WVD environments, they will be connecting to Azure AD Domain Services. Therefore, securing Azure AD Domain Services is important too.

By default, Azure Active Directory Domain Services (Azure AD DS) enables the use of ciphers such as NTLM v1 and TLS v1. These ciphers may be required for some legacy applications, but are considered weak and can be disabled if you don’t need them. If you have on-premises hybrid connectivity using Azure AD Connect, you can also disable the synchronization of NTLM password hashes.

To learn how to disable NTLM v1 and TLS v1 ciphers and disable NTLM password hash synchronization see Secure Azure AD Domain Services | Microsoft Docs

Azure Defender

For more tips we recommend the Microsoft Documentation ‘Security Best Practices for WVD’ here. For example, enable AppLocker and hide the Windows Explorer and local and remote drive mappings. Set a screen saver timeout, and disconnect idle sessions. Enable antivirus, EDR, and 3rd party vulnerability scanning and patch management. A lot of this is bundled by onboarding the hosts into Azure Defender (formerly known as Azure Security Center Standard). Pricing starts at $14.60 per server per month, see more pricing details here.

Stay Informed

To keep up to date with the latest announcements and improvements to Windows Virtual Desktop, check the release notes here once a month. I’m eagerly looking forward to support for Azure AD Join, so that WVD VM’s don’t have to join traditional domain controllers or AAD Domain Services.

[Update 5/26/2021] – Support for ADFS is now in PUBLIC PREVIEW: Announcing public preview of SSO using AD FS – Microsoft Tech Community

Securing Windows Virtual Desktop (1 of 2)

This is the first part in a two part blog series on securing Windows Virtual Desktop (WVD). In this first part we are going to setup the lab environment first. To skip the lab build and go right into securing WVD, proceed to part two (here).

First, why WVD? Should you use it? Consider the following:

  • If all your corporate applications are SaaS-based, you may not need WVD. You could instead use Microsoft Cloud App Security Conditional Access App Control to provide session proxy to prevent downloads or prevent copy/paste. WVD is a great fit when you need to virtualize applications or avoid pushing applications to desktop computers.
  • WVD can be pricey. For 100 users you are looking at a monthly bill ranging between $1,200 to $4,500 depending on whether you select a dedicated host per user or a shared (pooled) design. See the pricing table below for more information. I have also provided two great tips for keeping costs down.

So it really comes down to risk versus reward. If you need to provide a secure environment for people to connect to when you can’t assess the health of their personal machines, then WVD is probably a great value for the price.

So when is WVD a good fit?

  • Low bandwidth conditions. Consider a scenario where you have Intune Autopilot configured to ship a new computer to a remote outpost where internet is spotty or low bandwidth conditions. Pushing gigabytes of applications to that new desktop during the OOBE would be a poor experience, negatively impacting employee productivity and potentially their cellular bill depending on usage costs.
  • Contractors and Partners. Many organizations reluctantly provide VPN access to contractors and partners who use their own equipment. Who knows whether or not antivirus or encryption is installed and whether those machines have been compromised. WVD is a great alternative to provide remote access to your applications in an environment that you secure. So you may have been doing this already with on-premises RDS Farms or Citrix environments, WVD provides a way to further abstract the environment from your secure network by hosting the virtual machines in the cloud.

Lab Setup

To get started with WVD, let’s walk through what it takes to get a lab created so that we can have something to use for testing the security controls. You will need:

  1. Time. If you are starting from scratch, you’ll need four to eight hours to complete all the steps in this blog post.
  2. An Azure Subscription. (Sign up for a free account to get $200 credit here)
  3. Azure AD Domain Services Enabled (see quickstart guide here and full documentation here). (If you already have a domain controller in your lab, you can use that instead of Azure AD Domain Services). There are pros and cons for each that we will discuss below.
  4. Credentials to domain join. (If using AAD Domain Services, the user should be a member of AAD DC Administrators).
  5. A basic to intermediate knowledge of Azure. For example, you know what Resource Groups are, and Azure Networking concepts.
  6. Optional: Ability to create an external DNS TXT Record for simplified end-user sign-in to WVD

Step 1 – Sign into Portal.Azure.Com and search for Subscriptions.

Register the Microsoft.DesktopVirtualization Resource Provider in your Azure Subscription. Browse to your Azure Subscription and search for DesktopVirtualization as shown below and then click Register.

image

Step 2 – within the Portal.Azure.com administration page, search for Windows Virtual Desktop

image

Step 3 – Click Create a host pool

image

Step 4 – Basics.
Select a Subscription, Resource Group. Assign a name, and select a location. For this lab environment, select “No” for Validation environment. For the host pool type select Personal (so that you can have it turn off later when it is not being used to save costs… this option is not available for Pooled host pools). Select Automatic for Assignment type. For full step-by-step of this wizard, see MSFT documentation here. I’ll summarize the key decisions here.

image

Step 5 – Virtual Machines. You can do this now or later.
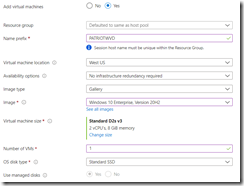
For this lab, we’ll put the VMs in the same resource group as the host pool. We’ll select a simple naming convention prefix, and select the same location as the host pool. We won’t configure any redundancy since its a lab. For the image, we’ll select the Windows 10 enterprise image (you could ‘bring your own image’ if that’s important to you for production). Select the default machine size and ‘1’ for the number of VMs. Go with the defaults SSD OS disk unless you want it to crawl.
If you decide to add VMs later, then after the Host Pool is created, click Session Hosts on the left navigation.

image

Networking. Now, the next part is important. For simplicity, select the same virtual network that you created for your Azure AD Domain Services. You did set this up first right? (It is a prerequisite!). If you haven’t done that yet, go back and select “No” for creating VMs now, so you can finish this wizard (You can always add VMs to your Host Pool later). If you need help creating Azure AD Domain Services, I have included a section of this blog post on that (scroll down for the section for creating Azure AD Domain Services).

Important: For the network security make sure you select “No” for the Public inbound ports for enhanced security: WVD uses a reverse tunnel so it is not necessary to unnecessarily allow random internet machines to brute force your RDP hosts. Next, select a Domain Administrator account or account that has permissions to join the machines to Azure AD Domain Services.
image

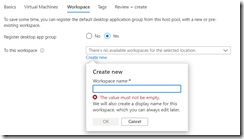
Step 6 –> Workspace.  You can create a workspace for applications now or later.
image

Step 7 –> Create.

image

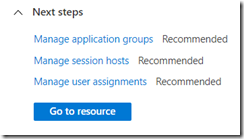
Step 8 –> Additional Recommended Steps:
– Managing Application Groups, Managing Session Hosts, and Managing User Assignments. You have to do this before your lab users can begin testing WVD.
image

Experts: Automating Lab Setup with PowerShell

If you are an expert with PowerShell and Azure, you can can automate the lab setup process with PowerShell. To install the PowerShell module

Install-Module -Name Az.DesktopVirtualization

Connect-AzAccount

Signing into your Azure account requires a code that’s generated when you run the Connect cmdlet. To sign in, go to https://microsoft.com/devicelogin, enter the code, then sign in using your Azure admin credentials.

After you sign in, get all your subscriptions first:

Get-AzSubscription | Out-GridView -PassThru | Select-AzSubscription

Then set your default subscription so you can make sure you are creating a host pool in the right subscription:

Select-AzSubscription -Subscription <preferredsubscriptionname>

To create a host pool:

New-AzWvdHostPool -ResourceGroupName <resourcegroupname> -Name <hostpoolname> -WorkspaceName <workspacename> -HostPoolType <Pooled|Personal> -LoadBalancerType <BreadthFirst|DepthFirst|Persistent> -Location <region> -DesktopAppGroupName <appgroupname>

This cmdlet will create the host pool, workspace and desktop app group. Additionally, it will register the desktop app group to the workspace. You can either create a workspace with this cmdlet or use an existing workspace.

More information here: PowerShell module Windows Virtual Desktop – Azure | Microsoft Docs

Connecting to the Lab

Many assume that Windows Virtual Desktop uses MSTRC.EXE but it uses msrdcw.exe which is not built-in to Windows and is downloaded separately here:

Windows Client Download: https://go.microsoft.com/fwlink/?linkid=2068602

Other clients are available too:

Web Client: https://rdweb.wvd.microsoft.com/arm/webclient

macOS 10.12 or later client download: https://apps.apple.com/app/microsoft-remote-desktop/id1295203466?mt=12

Android client download: https://play.google.com/store/apps/details?id=com.microsoft.rdc.androidx

iOS client download: https://aka.ms/rdios

Microsoft Store Client Download: https://www.microsoft.com/store/productId/9WZDNCRFJ3PS

Thin Clients Supported: Dell, HP, 10ZiG, IGEL, NComputing, and Stratodesk: Windows Virtual Desktop Thin Client Support – Azure | Microsoft Docs

The Subscribe Button

When you first launch the client, it will prompt to Subscribe using an email address or a URL.

image

To allow users to subscribe with their email you first need to create a DNS TXT record in your external DNS zone.

Note: If you were an early adopter of WVD and using the older classic edition then the Text value above is going to be different. Full instructions are found here.

Deploying WVD Client to users

Since WVD does not use the built-in RDP Client that ships with Windows, Administrators need to think about deploying the WVD client to their users. In most cases I think WVD is going to be used from BYOD workstations, or contractor workstations, which are unmanaged and therefore it will look like an email message sent with instructions for installing the client or guiding them to use the web client URL. However, if you are in the lucky position of controlling the software distribution to the computers that will be connecting to WVD, then the unintended installation looks like this:
Per device: msiexec.exe /I <path to the MSI> /qn ALLUSERS=1
Per user: msiexec.exe /i `<path to the MSI>` /qn ALLUSERS=2 MSIINSTALLPERUSER=1

To learn more about the administration options for the client, such as targeting members of the IT Department to use the Insider builds, click here.

User Experience

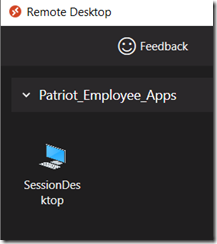
After launching the MSRDC client (not the MSTSC Client!) then the user will see the apps (or desktops) published to them.
image

Free Community Support for WVD

Get stuck? Have questions? Turn to the WVD Tech Community. Post a question and several MVPs and the Microsoft Product Group team will respond, often within a day. Windows Virtual Desktop – Microsoft Tech Community

Azure AD Domain Services

The virtual machines you provision in Windows Virtual Desktop need to be domain joined. In the host pool wizard you provide a username and password. The assumption is that you have configured the primary DNS in the virtual network to point to a domain controller or AAD Domain Services (for instructions on how to do this click here).

To avoid having to create a DC, you can expose an existing Azure AD to function as a kind of SaaS based domain controller emulator.

Before enabling AAD Domain Services, there are two important considerations:

1. Price. Expect to see a $109 fee appear on the Azure Bill when you enable the “Standard” version of AAD Domain Services (see pricing here).

2. Password Reset is required for Cloud-Only AAD Accounts. If you have cloud-only user accounts, those users must reset their passwords before they can begin to use a virtual machine that is domain joined to AAD Domain Services. This password change process causes the password hashes for Kerberos and NTLM authentication to be generated and stored in Azure AD. The account isn’t synchronized from Azure AD to Azure AD DS until the password is changed. Either expire the passwords for all cloud users in the tenant who need to use Azure AD DS, which forces a password change on next sign-in, or instruct cloud users to manually change their passwords.

Enable Azure AD Domain Services

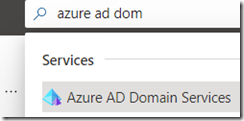
Step 1 –> Sign into Portal.azure.com and Search for Azure AD Domain Services
image

Step 2-> Click Create Azure AD Domain Services

image

Step 3-> Complete the wizard as shown below. When selecting the DNS Domain Name, do not use anything you are using today: but I recommend making sure you can purchase the domain name from a public registrar, because if you ever need to do secure LDAP then you can only buy SSL certs from domains you own. This may be a bigger deal for production deployments than this lab scenario.
image

Step 4 –> Select the defaults for the virtual network. (Note: This is for a lab build. If you are designing this for a production environment, there is a lot that goes into this decision, especially the subnet that you select and whether you want that to be routable to on-premises networks).

image

Step 5 – Add members to the AAD DC Administrators group. The user/s you select can then be used during the WVD wizard for domain joining VMs to AAD.

Before hitting the “Create” button, you are given a warning that several things are “set in stone” and cannot be changed (unless you delete AAD Domain Services and start over).

image

Be prepared to wait 30 minutes to 1 hour for the creation process to complete, and then you can update the Network Security group to use the IP address of the emulated domain controller, so that during domain join the Virtual Machines can establish a computer account trust with AAD Domain Services.

Don’t want to create AAD Domain Services? Then you’ve got to create a standard Domain Controller, and then setup AAD Connect to sync accounts to your Azure AD Tenant where you’ll then soft or hard match cloud-only accounts to the newly created domain controller. This is not insignificant for a lab build, so that is why we suggested AAD Domain Services.
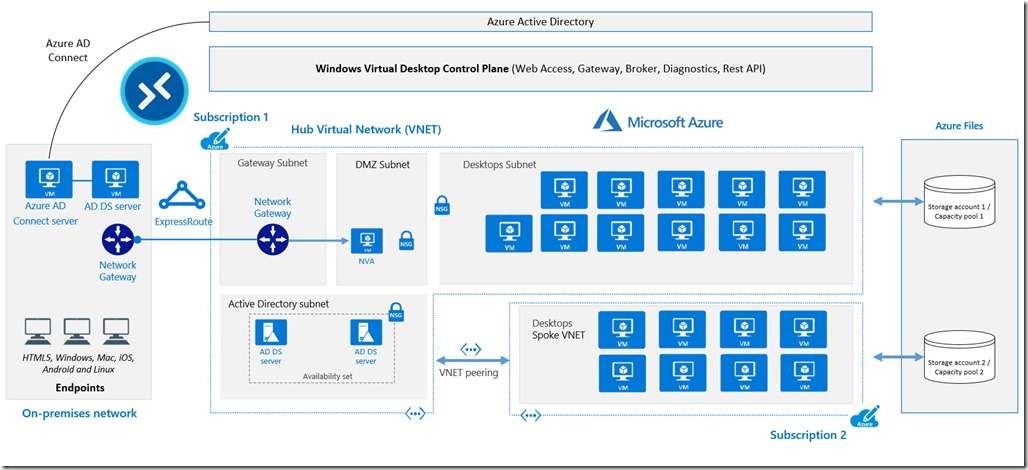
WVD

WVD has limitations and other enterprise considerations (see this MSFT article for more information on some enterprise planning concepts).

Windows Licensing

While you have to pay for the VM compute and storage, the Windows 7 or Windows 10 license costs are included for free inside the virtual machine as long as you have one of the following per user licenses:

  • Microsoft 365 E3/E5
  • Microsoft 365 A3/A5/Student Use Benefits
  • Microsoft 365 F3
  • Microsoft 365 Business Premium**
  • Windows 10 Enterprise E3/E5
  • Windows 10 Education A3/A5
  • Windows 10 VDA per user

If you have an active Software Assurance (SA) with Microsoft, then you can also virtualize Windows Server 2012 R2 and higher, using any RDS CAL licenses that you may have purchased in your enterprise agreement.

WVD Pricing

Use a Pooled Host Pool because it is only 25% of the cost compared to a Personal Host pool. However, Personal Host Pools have an option to shut down the VM when it is not being used, so there could be scenarios where a Personal pool could end up costing less if that feature is used. Personal desktops are typically chosen for two reasons: 1) For users that require administrative rights to modify the operating system and want those changes to be retained if the VM is restarted, or 2) For users which run applications that are not compatible with multi-session (Pooled Host).

  • A host pool designated for 100 “Personal” VMs will cost $4,545 per month! (See Azure Pricing Calculator here).
  • A host pool designated for 100 “Pooled” VMs will cost 75% less at just $1,164 per month
  • Discounts up to 72% are available with one-year or three-year reservations.
  • Additional cost considerations
    • Azure Defender license which is an additional $15 per VM, per month price.
    • Azure AD Domain Services is $109.50 per month (see pricing here),
      or
      A virtualized Domain Controller running in Azure IaaS (approximately about $40 per month depending on the VM size you select, and its best to get two for redundancy, and a VM for Azure AD Connect (About $120 total per month). If you have an existing AD on-premises with Azure AD Connect, then you’ll need to create a Virtual Network Gateway to connect via Site to Site VPN to your on-premises deployment with an existing domain and AAD Connect). I think the gateway is around $40 per month, plus per GB network traffic costs as explained here.

Here are two tips to keep your costs down in a production environment:

  1. “Start Virtual Machine on Connect” is a feature exclusively available for Personal Pools where the VM is shut down when it is not being used to save costs. To learn more about this preview feature click here.
  2. Scale Session Hosts automatically. You can use the scaling tool to:
        • Schedule VMs to start and stop based on Peak and Off-Peak business hours.
      • Scale out VMs based on number of sessions per CPU core.
      • Scale in VMs during Off-Peak hours, leaving the minimum number of session host VMs running.
        Learn more about scaling here.

Troubleshooting

1. If you get the error “We couldn’t connect because there are currently no available resources.” Then check the assignments. The user must be assigned to an Application Group, and a Workspace must be assigned to an Application Group. User –> Application Group –> Workspace –> Application.

2. MSRDC Error “the remote computer that you are trying to connect to requires network level authentication.” This can happen for cloud-only accounts that did not change their password *after* AAD Domain Services was installed. Change your password in Azure AD and then try again.

3. Error Code 1355 when trying to join the VM to Azure AD Domain Services. To get access to the log file on the VM, you need to open RDP 3389 with a public IP address assigned to the NIC, then update the Network Security Group to permit TCP 3389 from your IP (ideally not to the whole internet) for troubleshooting, so that you can gain access to the local logs on the server. Just-in-time Access is more secure but requires an Azure Security Center subscription. When you gain access, you can obtain the raw error logs from:
C:\WindowsAzure\Logs\Plugins\Microsoft.Compute.JsonADDomainExtension\1.3.6

For example, look for “Computer failed to join domain “______” from workgroup ‘WORKGROUP.’ This will often lead you to realize that the domain named used to create AAD Domain Services isn’t the same as the FQDN portion of the email address (UPN) used during the wizard to join the VM.

So let’s say you entered [email protected] as your AD Domain join UPN because that’s the true Global Admin UPN for Azure AD. Since your AAD Domain Services domain is most likely something different, like addscontoso.com, you need to enter the username like: [email protected] and then magically behind the scenes it knows to use the credentials from the real Azure AD domain.

image

Feedback

Did I miss anything? Have any tips? Please share your feedback with me on Twitter @ITGuySocal

Part two – Securing WVD

Now that your WVD lab is built, it’s time to learn more about securing WVD. To continue, click here for part two.

Is your Exchange Hybrid Server internet-facing? You have likely already been hacked

– This is twice as big as the SolarWinds breach.

– Patching is not enough! If your Exchange Server was open to the internet via TCP 80 or 443 between February 26 and March 3rd (or later) assume it was compromised.

At least 30,000 organizations have had a backdoor installed on their Microsoft Exchange Server (on-premises).

We know it is at least this many because researchers have built an NMAP script to scan the internet for infected hosts.

There is nothing to indicate that Exchange Online has been impacted, but organizations in O365 could still have been hacked because most of those customers still have an internet-facing Exchange Hybrid server.

How to hunt for the existence of a backdoor known as a web shell.
(A web shell is an internet accessible web page that the hacker places on the Exchange Server that gives the attackers administrative access to the Exchange Server)

Indicators of Compromise 

web.aspx
help.aspx
document.aspx
errorEE.aspx
errorEEE.aspx
errorEW.aspx
errorFF.aspx
healthcheck.aspx
aspnet_www.aspx
aspnet_client.aspx
xx.aspx
shell.aspx
aspnet_iisstart.aspx
one.aspx
RedirSuiteServerProxy.aspx
y.js
<random_name>.aspx (often 8 characters)

In these directories:

o c:\inetpub\wwwroot\aspnet_client\

o c:\inetpub\wwwroot\aspnet_client\system_web\

o C:\Exchange\FrontEnd\HttpProxy\owa\auth\

o %PROGRAMFILES%\Microsoft\Exchange Server\V15\FrontEnd\HttpProxy\owa\auth\

– Signs of large amounts of SMB network traffic from the Exchange Server to internal network

– Scheduled Task on Exchange Server named Winnet

– Check for suspicious .zip, .rar, and .7z files in C:\ProgramData\, which may indicate possible data exfiltration.

– Monitor c:\root and c:\windows\temp for LSASS dumps (attackers used procdump64.exe) or rundll32 C:\windows\system32\comsvcs.dll MiniDump lsass.dmp

In some cases, additional dynamic link libraries (DLLs) and compiled aspx files are created shortly after the  webshells are first interacted with via POST requests in the following locations:

  • C:\Windows\Microsoft.NET\Framework64\<version>\Temporary ASP.NET Files\root\
  • C:\Windows\Microsoft.NET\Framework64\<version>\Temporary ASP.NET Files\owa\

Administrator is removed from the “Exchange Organization administrators” group (credit rapid7)

– Scan Exchange Logs for IOCs (manually here) or with the Microsoft script (here)

– You can also use this NMAP script to see if your servers are vulnerable after patching them.

In the attacks observed, the threat actor used these vulnerabilities to access on-premises Exchange servers which enabled access to email accounts and allowed installation of additional malware to facilitate long-term access to victim environments.

On March 6th, a security researcher created a honeypot with these vulnerabilities and found that it was exploited 5 times in less than 24 hours. This indicates several copy-cat threat actors are already targeting these vulnerabilities.

If you find evidence of compromise, activate your incident response procedures. You may have a legal requirement to notify within 72 hours of sensitive data was accessed in your email or network.

What versions are affected?

– Exchange 2013 Versions < 15.00.1497.012

– Exchange 2016 CU18 < 15.01.2106.013

– Exchange 2016 CU19 < 15.01.2176.009

– Exchange 2019 CU7 < 15.02.0721.013

– Exchange 2019 CU8 < 15.02.0792.010

– Microsoft issued CU 31 for Exchange Server 2010 – best to apply that, but it would be better to upgrade your hybrid server since Exchange 2010 normally does not receive security updates (this was a kind gesture on Microsoft’s part).

How do we prevent this from happening again?

– The only reason an Exchange Hybrid Server should still be internet-facing is if there are still on-premises mailboxes. Move those to the cloud and then shut off internet access to your hybrid server after moving the Autodiscover DNS record to point to Autodiscover.outlook.com.

– If you have no on-premises mailboxes, you should close TCP 80/443 after moving Autodiscover to cloud

Learn more: Read the announcement, or view the Exchange blog. We also recommend the Volexity post (here) and Rapid7 post (here).

US Agencies and FireEye Were Hacked Using SolarWinds Software Backdoor

Multiple news sources are attributing the recent breaches (FireEye, the U.S. Treasury, and the U.S. Commerce Departments) to the same group: ATP29 Cozy Bear. The type of attack used is called a supply chain attack where a software vendor is targeted in order to breach the end-customer of that software. In this case, it was SolarWinds’ Orion Network Monitoring Software, which said their March and June 2020 software releases were compromised. Microsoft researchers have observed two files in October 2019 with code anomalies in the SolarWinds DLL, so it is possible that the initial access into SolarWinds may have occurred six months or longer before the malicious updates started spreading. The company estimates 18,000 of its 300,000+ customers may have installed the malicious update (this would make it the 2nd largest in history behind Citrix who had a similar attack happen to them with their install base of 400,000 customers – more on that later). SolarWinds is used by all five branches of the U.S. military, the Pentagon, State Department, Justice Department, NASA, the Executive Office of the President, the National Security Agency, the top 10 U.S. telecommunications companies, and 425 of the Fortune 500.
[Update 12/18/2020 So far Microsoft has identified 40 customers who may have been impacted, including Microsoft itself].
[Update 12/20/2020 A Chinese group called RedDrip posted on Twitter that they decoded the dynamically generated domain names that this malware used to communicate with C2, revealing the customer names that were hit. Others have used their code to post the customer lists on Pastebin (here and here).]

An emergency directive issued by the U.S. government agency Cybersecurity and Infrastructure Security Agency (CISA) calls on all federal civilian agencies to disconnect or power down SolarWinds Orion IT management tools because they are being used to facilitate an active exploit. Everyone else would be wise to follow this guidance too. CISA encourages affected organizations to read the SolarWinds and FireEye advisories for more information and FireEye’s GitHub page for detection countermeasures.

The Microsoft advisory from 12/13/2020 adds “if you suspect you are impacted you should assume your [email] communications are accessible to the actor” because the techniques observed including modifications to authentication to give persistence to email in Exchange Online, with clever techniques: “By impersonating existing applications that use permissions like Mail.Read to call the same APIs leveraged by the actor, the access is hidden amongst normal traffic.” Attackers apparently exported the private key from the ADFS token signing certificate and used that to forge SAML to gain access to cloud apps and on-premises resources. Therefore, if you use ADFS, you should consider changing the token signing certificate, or follow NSA’s recommendation to use Azure as the IDP instead of ADFS.

These supply chain attacks are not uncommon. In March of 2019 the FBI informed Citrix that they had been infiltrated for five months, as reported by Brian Krebs. In 2013, the US retailer Target was thought to be breached by a supply chain attack involving their HVAC system. In the Wipro’s data breach, hackers used ScreenConnect (ConnectWise) to gain access to their customer systems. NotPetya gained access through the accounting software M.E.Doc.

Since Microsoft’s Office 365 email may have been “an attack vector” used by the hackers, be sure to watch our best practices webinar series to secure your Office 365 environments. This is especially important if you are a software vendor for now obvious reasons, hackers want to use you to get into your customer installation base.

Always Assume Breach

Supply chain attacks highlight an important security principle: You should always assume that you have already been breached. For most organizations, it is not practical to review software update, nor would you have the original source code anyway. It’s better to just assume you have already been breached and adopt a mindset to always be ‘hunting’ for intruders. The attackers used signed binaries using Symantec certificate with thumbprint: 0fe973752022a606adf2a36e345dc0ed, meaning application control solutions that block unsigned executables would not have blocked the malicious backdoor from executing. According to this SANS video discussing the attack, the SolarWinds backdoor waits 12 to 14 days before sending its first beacon, presumably to avoid anti-malware sandbox detection or network-based behavioral learning periods.

Microsoft provides several tools that detect anomalous behavior, and provide hunting tools, including:  Azure Sentinel, Microsoft Defender for Endpoint, Microsoft Defender for Identity, and Microsoft Cloud App Security.
Note: Microsoft has already updated Microsoft Defender to detect the malicious code in the SolarWinds Orion product as “Trojan:MSIL/Solorigate.B!dha”.  My former colleague Matthew Dowst wrote a few hunting queries to detect the modifications to federation trusts and oAuth. [Update 1/4/2021]  CISA has published a tool to automate the detection (here). The issue is that the audit logs only go back so far (90 days unless Advanced Audit license was enabled).

[Update 12/23/20] For customers who had their Azure logs backing up to a Log Analytics (aka Azure Monitor) workspace then there is a new workbook that can help identify if suspicious activity in the tenant occurred.

  1. Modified application and service principal credentials/authentication methods
  2. Modified federation settings
  3. Azure AD STS Refresh token modifications by service principals and applications other than DirectorySync
  4. New permissions granted to service principals
  5. Directory role and group membership updates for service principals

Reference: Azure AD workbook to help you assess Solorigate risk – Microsoft Tech Community

[Update 12/24/2020] Just stumbled on this new guidance for Incident Responders from Microsoft here:

Advice for incident responders on recovery from systemic identity compromises – Microsoft Security

Includes some very helpful O365 forensic tools such as Hawk.

Need Help?

If you need expert assistance hardening Office 365, send us a request and we would be glad to help. Email us at Secure365 at PatriotConsultingTech.com

Does Defender scan USB drives?

No, not by default. But this isn’t as bad as it sounds! Here is Microsoft’s explanation from ~four years ago:

“Historically, antivirus products had a function to scan all files when a removable device was mounted. However, with the increase in device storage capacity, full scans of removable devices can noticeably and severely impact performance. Today, Windows Defender Antivirus performs quick scans on the contents of removable devices (such as USB drives), before the contents are copied, or executed. This approach both mitigates the risk that a malicious threat can infect the host through a removable device, while maintaining host performance. (A dormant file on a removable drive cannot infect a host). However, if needed, Windows Defender Antivirus can be configured to perform a custom scan on all files when removable devices are mounted. Below is a sample script for achieving this scenario Reference: TechNet Custom scan a USB drive (microsoft.com)

And a more recent, albeit abbreviated explanation from November 2020:

“You can optionally run a PowerShell script to perform a custom scan of a USB drive after it is mounted, so that Microsoft Defender Antivirus starts scanning all files on a removable device once the removable device is attached. However, we recommend enabling real-time protection for improved scanning performance, especially for large storage devices. Reference: How to control USB devices and other removable media using Intune (Windows 10) – Windows security | Microsoft Docs

I tested the “scanusb.ps1” script and it failed to detect the Eicar.com sample malware file on a USB Drive.

image

image

image

Also, the CPU spiked to 13% for the duration of the scan on the large drive.

image

But as soon as you attempt to interact with the file then its immediately caught by the AV engine:

image

Also, be aware that The default behavior for scheduled scans is to not scan removable media. You can enable it with Group Policy or running this confusing double-negative PowerShell command: set-MpPreference -disableRemovabledrivescanning $false

Therefore, I agree with Microsoft with this design decision and I will be guiding my clients to stick with the defaults which protect the machine from malware while avoiding costly CPU hits.