Category Archives: Security

Microsoft Entra Authentication Methods Policy Convergence

“Complexity is the worst enemy of security, and our systems are getting more complex all the time.” – Bruce Schneier (@schneierblog)

Microsoft recently launched “Authentication Methods Policy Convergence” (Public Preview). This is so very exciting because it exponentially reduces the complexity of multifactor authentication. I was part of the private preview program, and I’m very happy to see this feature going public.
In my book, “Securing Microsoft 365 (2nd Edition) (2022)” I write about the imperative of Zero Trust and how to configure multiple factors of authentication to prevent unauthorized access to Microsoft 365. Three years ago, I wrote about the most common MFA myths and misconfigurations that I have seen in customer environments.

As of the fall of 2022, only 25% of all authentications are protected by MFA in Microsoft Entra (Azure Active Directory). So this new simplified experience of configuring MFA is such an incredibly welcome improvement. I believe we will see a significant improvement in MFA adoption over the next two years. The reason it will take some time is because the policy convergence is not yet a forced experience, meaning we will still see customers configuring MFA in multiple portals until they learn about policy convergence. And that is why I am writing this blog article, to get the word out! In January 2024, the legacy multifactor authentication methods portal and SSPR authentication methods will be deprecated. Until then, it is very important to note that the new Authentication methods are evaluated in addition to the legacy MFA and SSPR policies.

One of the biggest improvements that I like about policy convergence is that not only do we get a single place to configure MFA authentication methods, but we also get the ability to target individuals and groups. Previously, if you wanted some users to have the ability to use SMS/TEXT or Voice then you had to enable it for the entire tenant. With policy convergence, we now have the ability to be more selective!

You can migrate your existing policies to the new blade at your own pace. Make sure to follow the latest Microsoft Documentation: “Migrate MFA and SSPR policy settings to the Authentication methods policy for Azure AD” and “ Manage authentication methods for Azure AD

Support for Hardware OATH tokens and Security Questions is coming soon. If you’re using hardware OATH tokens or Security Questions (for SSPR), do not proceed further. 

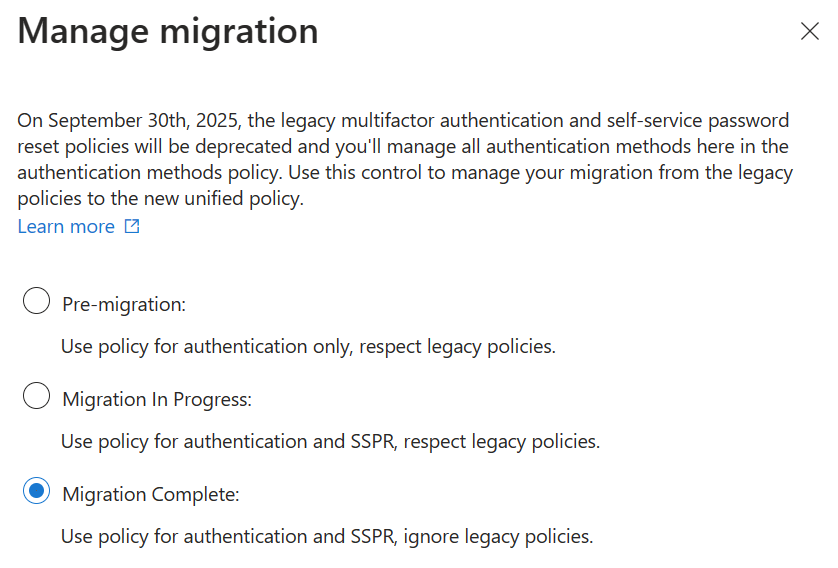
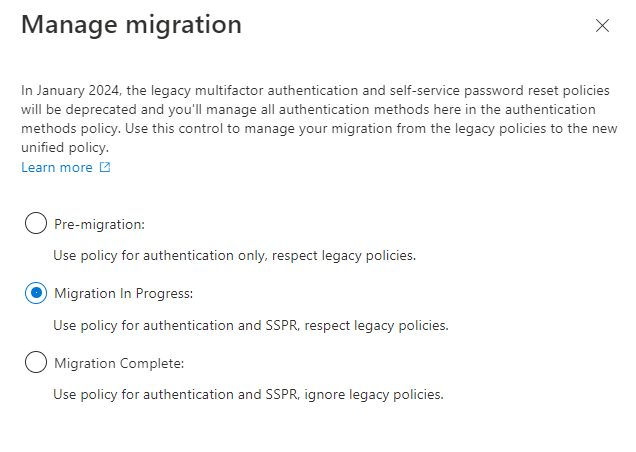
After you capture available authentication methods from the policies you’re currently using, you can start the migration.Open the Authentication methods policy, click Manage migration, and click Migration in progress. You’ll want to set this option before you make any changes as it will apply your new policy to both sign-in and password reset scenarios.

Screenshot of Migration in progress.

Then, update the new auth methods to match the methods you are currently using, or take this as an opportunity to eliminate the less secure methods. If you do that, just be aware that the user will be forced to register for the more secure methods at their next sign-in (so it would be wise to inform your helpdesk and send an email to your users about what they are going to expect!).

After you update the Authentication methods policy, go through the legacy MFA and SSPR policies and remove each authentication method one-by-one. Test and validate the changes for each method. Then go back to the migration process and mark the migration as complete.

Screenshot of Migration complete.

Be aware that it can take up to 15 minutes before changes are reflected.

After reviewing Jan Bakker’s (@janbakker_) blog post on this same subject, I realized that I could not improve upon it any further, so I just want to direct my readers there because he did such a good job on describing the experience in such great detail: https://janbakker.tech/goodbye-legacy-sspr-and-mfa-settings-hello-authentication-methods-policies/

For example, Jan points out “Ensure you have also enabled the combined registration portal for SSPR and MFA before using the new policies. Microsoft should have already enabled this feature, starting Sept. 30th, 2022, but I still see tenants where this is disabled.”  I too have seen customers with that disabled, so here is the setting that Jan shared on his post:

CISA Minimum Viable Secure Configuration Baseline for Microsoft 365

The Cybersecurity and Infrastructure Agency (CISA) in the United States of America is responsible for providing guidance to all United States government agencies and critical infrastructure.

On October 17th 2022 an initial draft (version 0.1) was released (here) for the minimum security configuration that “SHALL” or “SHOULD” be applied to Microsoft 365 Defender. 

The draft guideline states:

“Generally, use of Microsoft Defender is not required by the baselines of core Microsoft 365 products (Exchange Online, Teams, etc.); however, some of the controls in the core baselines require the use of a dedicated security tool, such as Defender. This baseline should not be considered a requirement to use Defender, but instead used as guidance for how these requirements could be met using Defender, should an agency elect to use Defender as their tool of choice. In addition to these controls, agencies should consider using a Cloud Access Security Broker to secure their environments as they adopt zero trust principles”

So in other words, if you are going to use Defender to secure Microsoft 365, then CISA has provided guidance on minimum security.

After reviewing the recommendations, my first suggestion to CISA is to update the title of this document to reference the specific product name that they are issuing guidance for. For example, the cover page states “Microsoft 365 Defender” which refers to a suite of many products, whereas the baseline recommendations included in the document seem to only reference one single Microsoft product: Microsoft Defender for Office.

In other words, if CISA intends to issue security baseline recommendations for the entire suite of M365 Defender, then this initial baseline is lacking recommendations for Defender for Endpoint, Defender for Identity, and Defender for Cloud Apps.

Let’s review each of their recommendations for a MDO security baseline.

Baseline 2.1 “Preset Security Profiles SHOULD NOT Be Used”

The very first recommendation is that you “SHOULD NOT” use the preset email security profiles in Microsoft Defender for Office (MDO) (Standard or Strict) which means you must instead customize each EOP + MDO setting.

CISA states “the preset security profiles are inflexible.“

Fortunately, they did not use the “SHALL” language because many organizations would benefit from the Standard and Strict preset profiles. These profiles will be adjusted over time by Microsoft to respond to threats on behalf of organizations.

For organizations that lack experience administering Office 365 then the preset policies will be less risky than untrained administrators attempting to customize each and every setting, because complexity is the enemy of security. The preset policies are very good in my opinion and they can greatly simplify the administration of email security policies if an organization decides to use Defender for Office.

So I recommend that CISA change this to the opposite, so that Preset Profiles SHOULD Be Used. Otherwise, CISA is going to have to come up with guidance on dozens of individual settings, and their guidance will quickly become obsolete as Microsoft continuously innovates and develops new features and old settings are deprecated.

Another reason that CISA should recommend to use the Preset Profiles is because the US Federal Government should have a clear standard that all email security settings are based on. If they are going to say “don’t use the preset configuration” then they need to exhaustively list a recommended configuration for each setting that has security implications. 

If CISA does not agree with the recommendations in the Strict or Standard policies, they should at least state which specific recommendations they disagree with.

Baseline 2.2 Data Loss Prevention

This recommendation is more strongly worded, that DLP “SHALL” be enabled. In other words, you don’t have a choice, get ‘er done!

However, it does not specify which confidence level should be used to block PII (Credit Card, TIN or SSN). For example, a high confidence block of SSN requires a strongly formatted SSN (xxx-xx-xxxx) and a keyword like “SSN” within 300 characters of proximity, whereas a low confidence block of SSN is an unformatted string of numbers like xxxxxxxxx (resulting in higher false positives, but provides a lower risk of data leakage). Presumably this nuance is left to the individual agency to decide but that should be made more clear in this document.

Two of the bulleted requirements require Endpoint DLP to be configured:

  • “A list of apps that are not allowed to access files protected by DLP policy SHOULD be defined”
  • “A list of browsers that are not allowed to access files protected by DLP policy SHOULD be defined.”

I recommend that the document call out that these two bulleted items require the Endpoint DLP product because it has the higher M365 E5 or G5 license. Endpoint DLP is considered a ‘Suite Feature’ included when the M365 E5 package is owned. As far as I know it is not possible to license Endpoint DLP separately.

The section 2.2.4 Implementation neglects a very important step of onboarding computers into Endpoint DLP. This should be added in order for the two bulleted items above to work properly.

Section 2.3 Common Attachment Filter Policy incorrectly states that a MDO Plan 1 or Plan 2 license is required. That is not correct, the common attachment filter is freely included in all EOP license plans (any license plan bundled with Exchange Online). Basically, just mirror the language used in section 2.6.3

Section 2.4 – the Zero Hour Auto Purge for malware should be changed so that it reflects the stronger “SHALL” language because when a file signature matches Malware, it is bad and in my experience Microsoft has a very low false positive rate for malware. Also later in section 2.6.1 the ZAP feature is listed as having the SHALL language, so section 2.4 should be updated to match the 2.6.1 policy recommendation for consistency.
Also, it incorrectly states that a MDO Plan 1 or Plan 2 license is required. That is not correct, the ZAP feature is freely included in all EOP license plans (any license plan bundled with Exchange Online). Basically, just mirror the language used in section 2.6.3

Section 2.7 – I recommend Safe Link policies use the stronger “SHALL” language rather than the current “SHOULD” language, effectively for the same reason why Safe Attachments in Section 2.8 have the “SHALL” language.

Microsoft increases email security market share 18%

Back in 2019, I wrote a blog post (here) explaining how to identify the primary DNS MX records used by the Fortune 500 and then use that to identify email security vendor market share. Then in 2020, I wrote a post that Microsoft had dipped 12% while others gained.

So when I ran the analysis again today, I was surprised to see that Microsoft had gained 14 new clients since the last time I had run the report two years ago. During that same time ProofPoint and Cisco also gained while Symantec and others lost market share amongst the Fortune 500.

image

I am asked all the time by customers “Is Microsoft “good enough?” Yes, but you don’t have to take my word for it. Microsoft just received the “AAA Protection Award” from SE labs—a testing lab focused on assessing the efficacy of security solutions. They evaluated email security vendors against a range of real-world email attack scenarios. They found 97 percent of emails that contained threats were blocked. That’s pretty good! Read more about Microsoft’s results here.

At the 2019 Microsoft Ignite Conference, there was a presentation (available on YouTube here) given where Microsoft made a pretty compelling case: since they sit behind other email security vendors (when mailboxes are hosted in Exchange Online) they can see when they could have blocked threats that others missed. In the graphic below, they claim to catch 400% more things than competitors!

image
MSFT misses 0.002% whereas competitors are missing 0.01% and 0.012% (that is a difference of 400%). To be sure, the competitors will make similar claims since Microsoft is unaware of their unique catch rates.

Industry analysts such as Forrester have named Microsoft a leader in email security (read the announcement here)

image

10 Reasons why I recommend Microsoft for Email Security

There are ten reasons why I recommend Microsoft email security to my clients:

  1. Automatic signal sharing with Microsoft Defender for Endpoint
  2. Protect malicious links in SharePoint, OneDrive, Teams, Office on the Web, and Microsoft 365 Apps for Enterprise
  3. Safe Documents
  4. Lateral Phishing Protection
  5. Native Link Rendering
  6. Anti-Phishing (prevent Business Email Compromise)
  7. Automatic Investigation and Response
  8. Threat Explorer
  9. Threat Hunting & XDR Integration
  10. Performance

Automatic signal sharing with Microsoft Defender for Endpoint

Whereas most other email security vendors create a silo of malicious file hashes when threats are detonated, Microsoft is able to share this information with Defender for Endpoint within milliseconds because they share a common back-end “the Intelligent Security Graph (PPT Download link).”

image

Protect malicious links in SharePoint, OneDrive, Teams, Office on the Web, and Microsoft 365 Apps for Enterprise

Whereas other email security products are typically limited to scanning only external emails, Microsoft is able to scan hyperlinks and attachments throughout the productivity applications. This is important because hackers often like to hide their malware in trusted locations such as OneDrive or SharePoint because most organizations cannot afford to block these root URLs since they are also used for business productivity.

Safe Documents

Safe Documents uses the cloud backend of Microsoft Defender for Endpoint (MDE) to scan documents opened in Microsoft Office. Users do not need to have MDE installed for this to work.

License Requirements: M365 E5 Security or full M365 E5. It is not included in the EOP or MDO license plans, you need the E5 Security step-up license (added to M365 E3) or the full M365 E5 suite.

Enable with PowerShell here:
Set-AtpPolicyForO365 -EnableSafeDocs $true –AllowSafeDocsOpen –$false

Learn more about Safe Documents in the Microsoft Documentation (here).

Lateral Phishing Protection

When mailboxes are hosted in Exchange Online, Microsoft is able scan internal emails, whereas other security vendors are usually limited to only when emails are external. Microsoft uses its advantage of hosting the email platform to perform this internal email scanning. This is valuable because if a hacker compromises an account, they will often use that to attack other internal accounts since it will look more trust worthy.

Learn how to configure safe link policies in the Microsoft Documentation (here)

Native Link Rendering

image
When email security vendors re-write the URL back to their service, they do so because they want to examine the hyperlink at the time of click for threats. Since Microsoft ‘owns’ the Outlook clients (mobile, web, desktop) then they can render the original URL when the user hovers over the link. This is helpful so that the user can use their security awareness training to better judge if the link appears suspicious. Other vendors cannot achieve this since they do not own the most popular email client used in the enterprise.

Read about the announcement of Native Link Rendering back in 2018 (here)

Anti-Impersonation in Anti-Phishing Policy to prevent Business Email Compromise

image

You can configure anti-impersonation for up to 350 users in a single policy (multiple policies are permitted). The idea is to protect your top executives from having their Display Name impersonated, or domain names that look similar to the domains you own. 

Learn more about how to enable Anti-Phishing in the Microsoft Documentation (here)

Automatic Investigation and Response

After a potentially malicious URL click is detected in email, or is manually reported by a User or Admin, or a SOC analyst who integrates AIR with their SIEM uses the Office 365 Management Activity API, then an automated playbook is launched to perform a deep investigation of these 13 steps:

1.Analyze user activity anomalies in Microsoft Cloud App Security, and check the attachment against Defender for Endpoint

2.On-demand check of domain reputation from Microsoft’s ISG and external threat intelligence sources

3.Detect anomalies based on historical mail flow sending patterns for users in your organization

4.Extract indicators from header, body and content of the email for investigation

5.Investigate mail delegation access for user mailboxes related to this investigation

6.Investigate any violations detected by Office 365 Data Loss Prevention (DLP)

7.Detect intra-org and outbound malware or phish originating from users in your organization

8.Investigate any mail forwarding rules for user mailboxes related to this investigation

9.Email cluster analysis based on (1) header, (2) body, (3) content and (4) URLs

10.On-demand check on URL reputation from Microsoft’s ISG and external threat intelligence sources

11.On-demand check of IP reputation from Microsoft’s ISG and external threat intelligence sources

12.Email cluster analysis based on outbound mail flow volume patterns

13.On-demand detonation triggered with Defender for Office 365 for emails, attachments and URLs

Then an Administrator is presented with an option to soft delete the emails:

image

Learn more (here).

Threat Explorer

Assuming you have permissions and licensing, you can navigate to Threat Explorer directly here: https://security.microsoft.com/threatexplorer

Threat Explorer is very powerful. You can:

  • See malware detected by Microsoft 365 security features
  • View phishing URL and click verdict data
  • Start an automated investigation and response process from a view in Explorer
  • Investigate malicious email, and more

Learn more about Threat Explorer (here).

Also the “Email Entity Page” is also helpful in investigations. Check it out (here). The Microsoft documentation is very good (much better than competitor products).

Threat Hunting & XDR Integration

If you know Kusto Query Language (KQL) then you can construct queries across inboxes, devices, identities, etc. You can also integrate with a SIEM such as Sentinel for true XDR. Sample queries:

  • Finds PowerShell activities that occurred right after an email was received from a malicious sender
  • Find the first appearance of files sent by a malicious sender among all devices or inboxes
  • Find emails containing open redirect URLs, for example:

EmailUrlInfo

| where Url matches regex @”s?\:\/\/(?:www\.)?t\.(?:[\w\-\.]+\/+)+(?:r|redirect)\/?\?”

  • Logons to a device after a malicious email was received, for example:

EmailEvents

| where Timestamp > ago(7d)

| where ThreatTypes has_cs “Malware”

| project EmailReceivedTime = Timestamp, Subject, SenderFromAddress, AccountName = tostring(split(RecipientEmailAddress, “@”)[0])

| join (

DeviceLogonEvents

| where Timestamp > ago(7d)

| project LogonTime = Timestamp, AccountName, DeviceName

) on AccountName

| where (LogonTime – EmailReceivedTime) between (0min .. 30min)

Learn more about advanced hunting (here)

Performance

The speed at which Microsoft can detonate attachments is impressive.

Most emails are detonated for threats within 5 to 12 seconds.

image

Can you imagine what it would take for you to build enough virtual machine capacity in your on-premises network to open every single email attachment received in a separate virtual machine to analyze behavior?

Here is a report you can use to analyze the latency introduced by Microsoft’s email security: https://security.microsoft.com/mailLatencyReport

Try it out

If you are using a 3rd party email security solution, you can begin to evaluate Microsoft Defender for Office now. You will need an E5 Trial subscription and you need to be a member of the Security Administrator and Exchange Administrator roles to set up the evaluation.
Learn more here: https://docs.microsoft.com/en-us/microsoft-365/security/office-365-security/try-microsoft-defender-for-office-365?view=o365-worldwide

Make the switch!

Already convinced? You can plan to make the switch from a 3rd party email security vendor to Microsoft by following the excellent documentation (here) or contacting a Microsoft Partner (such as Patriot! (My company!) – contact us at [email protected] for a quote!).

Azure AD Combined Registration (SSPR + MFA) is rolling out by October 2022

I’m starting to get questions from my customers about what to expect when the Azure AD “Combined Registration” feature is enabled beginning October 2022 and completing January 2023. On March 29th 2022 Microsoft published MC348869 in Message Center.

A bit of background: In April 2020, the combined security information registration experience for registering both multi-factor authentication (MFA) and self-service password reset (SSPR) was made available as an Opt-in feature but otherwise disabled by default.

We quickly encouraged everyone to enable it, for two primary reasons:

1. It simplifies the user experience so they register once instead of twice (when both MFA and SSPR are both used)

2. FIDO2 Security Key registration requires that the combined registration feature is first enabled. this is required if you want to go passwordless, as FIDO2 has use cases that augment WH4B and Authenticator app such as shared workstations or when employees don’t want to use their personal phones for authentication. It also adds URL binding so that users don’t get phished. But this isn’t a blog about FIDO2, I just can’t help use every opportunity to evangelize it – go use it now!

As you can see, even if you don’t use SSPR, it’s still valuable to enable the FIDO2 passwordless experience.

So does this change impact me?

Did you create your tenant after August 15th 2020? Then no, this change won’t impact you because any tenant created after that date already has Combined Registration enabled.

You can go check out to see if you have it enabled by following these instructions:

1. Sign into the Azure portal (portal.azure.com) with a privileged role such as “user administrator” or “global administrator.”
2. Go to Azure Active Directory > User settings > Manage user feature settings.
3. Under “Users can use the combined security information registration experience” – record the setting.

If it is not enabled for all users, then you can select an option to enable it for a pilot group so that you can record the new user experience , and then decide if you want to update your onboarding documentation.
Microsoft provides screen shots of the new experience here:
https://support.microsoft.com/en-us/account-billing/set-up-security-info-from-a-sign-in-page-28180870-c256-4ebf-8bd7-5335571bf9a8

Will there be any user impact?

Another customer recently asked me: “I use ADFS, and I do not have SSPR enabled, will this change impact me?”

Potentially yes. If your tenant currently does not have combined registration enabled, and you do not have SSPR registration currently required, then it is possible that if your SSPR authentication factors are not aligned to your MFA factors then I could imagine a scenario where users would be required to register for the SSPR factors when this change rolls out in October.

So my advice for everyone is to go into your SSPR authentication factors and try to align those with your MFA factors.

What makes this a confusing time (June 2022) is that there are three separate areas to configure factors.

1. Legacy MFA portal

image

2. SSPR Portal
Authentication methods selection in the Azure portal

3. Azure AD Portal – Authentication Methods

image

Eventually I expect these portals to be consolidated into the 3rd portal. Until then, sometimes users are not aware of all these locations to configure the authentication experience.

And recently, one of my customers was confused by the 3rd portal, thinking that “text message” had to do with using SMS as 2FA

image

No – remember this list of options are for passwordless authentication methods. So this text message option is for using your phone number instead of username, then you type in the code on your phone instead of a password (useful for retail environments where there is high employee turnover). Learn more about SMS-based authentication as an alternative to usernames/passwords in the Microsoft documentation here. Just because it is there, does *not* mean you should turn it on! Remember, SMS based authentication is weak! See Alex Weinert’s article “It’s Time to Hang Up on Phone Transports for Authentication.

Pre-registering MFA in M365

This article describes how to make the user onboarding experience into MFA as smooth as possible by pre-registering MFA methods.

Disclaimer: This article only applies to organizations that have decided to use Phone Number for verification. This is not recommended but in some organizations, they are unable to avoid this for a variety of reasons. If you want to learn why phone number verification is weak, check out the Microsoft Article: https://techcommunity.microsoft.com/t5/azure-active-directory-identity/it-s-time-to-hang-up-on-phone-transports-for-authentication/ba-p/1751752

The most ideal scenario would be to deploy Passwordless MFA, such as Windows Hello for Business, Authenticator App, FIDO2 Keys, or Certificate (Preview). You might issue a Temporary Access Pass to allow users to register passwordless methods without knowing the password to the account.

For more information on planning a passwordless deployment, click here: https://docs.microsoft.com/en-us/azure/active-directory/authentication/howto-authentication-passwordless-deployment

Ever wonder what is required to pre-register a user for Phone or Email?

The “Authentication Methods” page displayed in Portal.Azure.com > Azure Active Directory > Users, allows you to pre-define the phone number that would be used for MFA.

image

If you use Always ON MFA, then you can set the user to Enforced. This can be automated with a GUI or PowerShell, or the preferred method would be to use a Conditional Access Policy (if you have Azure AD P1 or EMS E3 or M365 E3).

image

Their very first sign-in experience would be:

image

Otherwise, if you only populate the Mobile Phone field (such as in on-premises Active Directory, and then it synchronizes to Azure AD) then the user’s first sign-in experience will be to verify that the number shown is correct.

image

image

To populate the mobile phone using PowerShell, you can use PowerShell as described here: https://docs.microsoft.com/en-us/azure/active-directory/authentication/howto-sspr-authenticationdata

But if you want to populate the Authentication Phone Number (so that the user can skip the registration page) then the PowerShell gets a little bit more involved.

Method 1 – Using PowerShell version 1 as described here: bulk Pre-registration for Azure MFA for more Seamless Single Sign on and smooth for MFA roll out – Microsoft Tech Community

Method 2 – Using MS Graph as described here: Pre-configure Authentication Methods for end users in Azure AD – Identity Man (identity-man.eu)

At this point I would strongly encourage you to enable number matching notifications and then enable the registration campaign.

Note: After September 30th 2022, the Combined Registration feature will be enabled in all tenants worldwide. This means that if you are using Self Service Password Reset, then the registration experience for users will be combined.
Therefore, instead of waiting until September, I would enable that feature now so that you can update your end-user facing documentation and user communications once rather than twice.
Learn more about Combined Registration here: Combined registration for SSPR and Azure AD Multi-Factor Authentication – Azure Active Directory | Microsoft Docs

Lapsus$ gains access to OKTA and Microsoft

Today (3/22/2022) both OKTA and Microsoft released statements about a threat actor named LAPSUS$ (Microsoft tracks as DEV-0537) who gained access to both organizations. In the last 90 days, this same threat actor has claimed victims including Impresa, NVIDIA, Samsung, Mercado Libre, Vodafone, and most recently Ubisoft.

In the case of Microsoft, the attack appears to be limited to portions of source code related to Microsoft’s Bing, Bing Maps, and Cortana.

“This week, the actor made public claims that they had gained access to Microsoft and exfiltrated portions of source code. No customer code or data was involved in the observed activities. Our investigation has found a single account had been compromised, granting limited access. Our cybersecurity response teams quickly engaged to remediate the compromised account and prevent further activity. Microsoft does not rely on the secrecy of code as a security measure and viewing source code does not lead to elevation of risk. The tactics DEV-0537 used in this intrusion reflect the tactics and techniques discussed in this blog. Our team was already investigating the compromised account based on threat intelligence when the actor publicly disclosed their intrusion. This public disclosure escalated our action allowing our team to intervene and interrupt the actor mid-operation, limiting broader impact.”

I recommend reading Microsoft’s write-up on this incident as it gives a detailed glimpse at the threat actor’s TTPs. For example, the threat actor is paying employees to gain access to victim networks.

However, in the case of OKTA, it appears the attack was more substantial based upon the 8 screen shots that LAPSUS$ made public (here).

The original official statement from OKTA seems to contradict what the hacking group is claiming.

“In January 2022, Okta detected an unsuccessful attempt to compromise the account of a customer support engineer working for a third-party provide”

https://sec.okta.com/articles/2022/03/official-okta-statement-lapsus-claims

The laptop of a support engineer appears to have been compromised. The attacker would have the ability to reset passwords and Multi Factor Authentication for users.

Then Zack Whittaker reported that OKTA reported 366 corporate customers were impacted.

https://techcrunch.com/2022/03/23/okta-breach-sykes-sitel/

Brian Krebs reported that the ringleader of LAPSUS may be a 17-year-old from the city of London, England, who goes by the handle WhiteDoxbin with a net work of $14 million (300 BTC).

https://krebsonsecurity.com/2022/03/a-closer-look-at-the-lapsus-data-extortion-group/

The BBC is quoting that seven people between the ages of 16 to 21 have been arrested.

OKTA Recommendations

1. If you are an OKTA customer, active Incident Response Plans, assume compromise happened between January 16 to 21

2. Collect and retain related logs. Okta System Logs are only available for a limited time (90 days) so you should download those immediately.

3. Hunt for evidence of suspicious password resets or changes to MFA on or around 1/16 to 1/21

4. Rotate Okta privileged passwords.

5. Look at the Okta Admin Console app in particular

legacyEventType eq “app.generic.provision.assign_user_to_app”

the “app.generic.provision” event type

and to identify any users granted access to other apps.

Another event worth checking on is “security.threat.configuration.update” to see any changes to Okta’s behavioral threat detection.

SIEM rules

https://github.com/SigmaHQ/sigma/tree/master/rules/cloud/okta

https://github.com/elastic/detection-rules/tree/main/rules/integrations/okta

How to use Intune Device Enrollment Restrictions to block “Second Wave Phishing”

Microsoft recently published an article (here) describing a new phishing attack where attackers will attempt to bypass Azure AD Conditional Access Policies configured for ‘Require Compliant Device.”

image

When an attacker obtains the 1st factor credentials (username and password) they will be greeted by a warning message that informs them that they cannot sign-in due to a conditional access policy. But here is the irony,  the warning message informs the hacker exactly how to bypass the block, step by step! (To be fair, the warning message was designed to help users enroll their devices.. but still.. in this day and age, we don’t need to be giving novice hackers free advice on how to bypass our security controls!)

image

So after the attacker realizes that Conditional Access has been configured to require Intune Compliance, now all the hacker has to do is find a device to enroll into Intune. The attack consists of a hacker logging into a virtual machine they control somewhere, and then they Azure AD Join it to the target organization (with MDM Auto Enrollment), or Azure AD Register with Device Management (Intune) because they have obtained the username and password of the user. Perhaps the user had MFA enabled on their account, but the user has  accidentally authorized the attacker to logon via MFA Push Notification or Phone Call (this happens a lot actually, so you should switch users to Code Match, or wait for Microsoft to roll it out which is coming soon).

It’s worth noting that the way the article was originally written, it made it seem like the registration or Azure AD join itself would be a security concern, but it is not, because as soon as you reset the password of the user, then the primary refresh token is invalidated. Applications with Continuous Access Evaluation will be revoked within 15 minutes (at most) and legacy apps may take up to 60 minutes. You can also create an Azure AD Conditional Access Session policy to limit session lifetime too.

The other issue I had with the article is that it said the problem happens when MFA is not enabled for Device Registration or Azure AD Join. While this can help reduce the risk of it happening, it doesn’t prevent it. There is a better setting in my opinion that does a better job of preventing it which is blocking device registration of personal devices into Intune.

Endpoint.Microsoft.com > Devices > Enroll Devices > Enrollment Device Platform Restrictions

image

This is a setting that you can apply to All Devices, All Users, or you can scope to selected groups (devices or users). It will prevent the hacker from joining a device to Azure AD and then becoming auto-enrolled. The setting is called Enrollment Restrictions and you set it to block personally owned devices from enrolling into Intune (Ideally you would do this for all device types, not just Windows). This is what I recommend unless you have not yet configured Autopilot or other methods of enrolling devices into Intune. Otherwise, then you must follow the recommendation from the Microsoft article which is to require MFA for enrollment https://portal.azure.com/#blade/Microsoft_AAD_Devices/DevicesMenuBlade/DeviceSettings/menuId/

image

In my opinion, blocking personal device enrollment into Intune is by far the most secure way to go because it really cuts at the heart of what the attacker is trying to do which is to bypass the CA Policy that requires Intune Compliance. Remember: A rogue device that is AAD Registered or AAD Joined is not a threat to your organization, it’s better to think of it as an extension of the user’s identity that enables that user to achieve SSO. When there is no network transport to the internal network (no VPN) then it’s equally fragile to a password reset of the user’s credentials. Think of it this way: without Intune enrollment, these other device states cannot move laterally into the target network to perform the ‘second wave phishing campaign’ described in the Microsoft article. Or to be more verbose, since a Conditional Access Policy Grant Control cannot factor Registered Device or AAD Join device status, it can only filter based on Intune Compliance or Hybrid Domain Join.

The second option is to limit MDM auto enrollment is to scope specific groups rather than ALL users.

image

I don’t recommend this because it will have unintended side effects for things like Windows 365 or Autopilot.

What is Device Identity

One of the most confusing things about all of this is what is Device Identity in Azure AD?

Registered
Devices that are Azure AD registered are typically personally owned or mobile devices and are signed in with a personal Microsoft account or another local account.

Azure AD Joined
Devices that are Azure AD joined are usually owned by an organization and are signed in with an Azure AD account belonging to that organization. They exist only in the cloud. By default, nothing would prevent a user from being able to Join their personal machine in this manner (and that is why I believe Enrollment Restrictions to block “Personal Devices” are important to consider, as it would block people from Azure AD Joining their devices).

Hybrid Joined
Devices that are hybrid Azure AD joined are owned by an organization and are signed in with an on-premises Active Directory Domain user account belonging to that organization. This account is then in an OU that is synced to the Cloud, and Conditional Access Policies can then use this to device state as a Grant Control.

References:https://docs.microsoft.com/en-us/azure/active-directory/devices/overview#getting-devices-in-azure-ad 

See also https://o365blog.com/post/devices/

What prevents a rogue user from categorizing their personal device as corporate owned to bypass policy?

Or what if someone has no problem with their personal device being managed by their corporation? Maybe their organization pays them a stipend (this is becoming more and more common as a pseudo-BYOD or hybrid BYOD). In these scenarios, if you configured Device Enrollment Restriction then you will block an individual user from enrolling ANY device into Intune, since it will always default to personal. So then how would a user enroll a device? Short answer, by themselves they wouldn’t – they will need someone to pre-register it for them such as AutoPilot or an AD GPO to enroll Windows device as a corporate device. Other device types like iOS, Android, or macOS allow you to enter a serial number or IMEI but that option is not available for Windows.

Important Side Note: This forum post illustrates what happens when you configure enrollment restrictions to block Personally owned devices to Block but then neglect to manually change Autopilot devices to Corporate. They will get error 80180014 because they forgot to set the Autopilot devices to Corporate. https://techcommunity.microsoft.com/t5/microsoft-intune/error-80180014-due-to-device-restrictions-for-windows-autopilot/m-p/1155809

Seeing Device Enrollment Restriction in Action

If you attempt to enroll a device when Enrollment Restrictions are configured to block personal devices then there is no way I could find to circumvent this control, which is AMAZING because that is what we want to achieve to prevent a hacker from enrolling a device into Intune and bypassing Conditional Access Policies that limit authentication to only compliant devices.

image

Then in the Event Viewer Log Microsoft-Windows-DeviceManagement-Enterprise-Diagnostics-Provider/Admin you will get Event ID 52

“MDM Enroll: Server Returned Fault/Code/Subcode/Value=(DeviceNotSupported) Fault/Reason/Text=(Device Identifier not preregistered).”

Require MFA for Device Registration

The Microsoft article states that enabling MFA for device registration would prevent this attack. The reason I don’t like this as the *only* control is because users can still accidentally approve a push notification, or they might have a man-in-the-middle phishing attack like EvilGinx. So keep this ON, but don’t rely on this as the *only* control.

image

If you want more granularity you can set the setting above to No and then configure it in Conditional Access Policy to force MFA when registering or joining

image

The Microsoft article also correctly points out that Intune enrollment can be restricted to an IP range via Conditional Access Policy. This would only work if remote users already have a VPN established with force-tunnel (whereas split-tunnel is much more common).

Summary

Relying on conditional access policies to requires compliant devices without also restricting enrollment into Intune through the various methods described in this article can lead to the attacker bypassing Conditional Access Policies that require Intune Compliance, leading to unauthorized access to SaaS apps or network resources. For example, in the worst case scenario, “Second Wave Phishing” would happen if Auto MDM Enrollment happens after an AAD Join or Device Reg (‘enroll only in device management”) setting, then a VPN configuration is automatically pushed down to the device, and then the AAD Joined machine is able to connect to other network resources. Ouch!

TIP

I should also point out that Microsoft recently created a Conditional Access Overview page that can help you spot other misconfigurations.

https://portal.azure.com/#blade/Microsoft_AAD_IAM/ConditionalAccessBlade/Overview

image

Get Help

Head over to the Microsoft Technical Communities to ask questions and get free peer support:

https://techcommunity.microsoft.com/t5/communities/ct-p/communities

I am always interested in feedback. If you feel I got it wrong or if you would do it differently please DM me on Twitter at @ITGuySocal

-Joe

What happened to the Email Security Funnel Reports?

Don’t feel bad if you missed the September 20th 2021 blog post titled “Improving the reporting experience in Microsoft Defender for Office 365

To be clear, most of us only have time to read about user impacting things where features are being taken away as that typically draws our attention. So when we read a headline like this, we may put it on the backburner until we have time to get to it later.

Then comes the day when you start looking for your favorite report and you can’t find it! It’s missing!

image

Yes, Microsoft has retired SIX reports: the malware email detection report, the spam report, the safe attachment file types, and deposition report, the sent and received email report, and the URL trace report that previously lived in the exchange admin center.

But as bad as that sounds, it’s actually not that bad at all. Why? Microsoft has replaced the reports with new and better reports, you just need to know where to go look for it. Basically the Funnel Report has been replaced with a newer and more modern “Sankey” report.

https://security.microsoft.com/mailflowStatusReport?viewid=sankey

clip_image002

The report is interactive, so if you click on ‘impersonation’ it will expand like this:

clip_image002[5]

The other benefit of the new report over the old one is the filtering capability is significantly more robust.

“In order for SecOps to focus the scope of their assessment with a lot more granularity, we are providing security professionals the ability to filter data by organization domain, policy type and name, priority account user tag, recipient address and email directionality (inbound and outbound).”

The new report also has a cool new ‘trendline’ flyout report that appears on the right after clicking on ‘show trends’

clip_image004

clip_image006

Here is the documentation page describing all the new features and capabilities of the new report. What’s really helpful about the documentation is it describes that of the 6 reports that have been retired, it tells you the hyperlinks of how to find the information in the new reports!

https://docs.microsoft.com/en-us/microsoft-365/security/office-365-security/view-email-security-reports?view=o365-worldwide#mailflow-view-for-the-mailflow-status-report

Other benefits: PowerBI and reporting API integration, and data going back > 90 days. <- This is huge.

Summary

Yes, change is hard sometimes when you get used to going somewhere and then a blog article gets posted, you miss it, and now you cannot find your data. Normally, Microsoft adds banners inside the product letting you know that a dashboard is coming or you have 30 days to enjoy it before its gone, so I am not sure why that did not happen in this case, but I am sure we can all agree the new reports are better and we will all enjoy the 90 day + increased historical data that the reports will pull, increased filtering, better details and drill downs, etc.

Conditional Access Policy to Block Non-Compliant Devices

Recently came across a scenario where we needed to block access to everything in Azure Active Directory (AAD) for non-compliant devices. Setting up that Conditional Access (CA) Policy was not a problem. The problem was it worked too well, and it even blocked the ability to register new devices into Intune for them to get the appropriate compliance policies.

Here is the error we were receiving when trying to enroll devices:

clip_image002

Based upon this denial of access error we knew that the policy was too strict, and we needed to allow for enrollment of new devices to get compliant. We went back into our policy that was set to block all cloud apps and excluded Microsoft Intune Enrollment.

After saving the policy we then went into testing mode and then got this:

clip_image003

SAME ERROR!!!!!

We then investigated into the Microsoft documentation to try and find more information about Intune Enrollment and CA Policies. We stumbled upon this link that breaks down the steps required to configure a CA Policy for Intune enrollment with Multi-Factor Authentication (MFA)

https://docs.microsoft.com/en-us/mem/intune/enrollment/multi-factor-authentication

We do have MFA turned for our users in this environment, but this article only highlighted using the Microsoft Intune Enrollment app for MFA at enrollment. Our policy to block access was at least allowing for the MFA prompt to occur, but not enrollment. This example policy also is not blocking any other apps, just requiring MFA for the Windows Intune Enrollment app.

In the document we notice it mentioned another Intune app – called Microsoft Intune

clip_image005

Searching for Microsoft Intune will yield a plethora of information, but we needed the details on the cloud app. We then searched for the cloud app we found this link that identifies all the cloud apps available for CA Policies.

https://docs.microsoft.com/en-us/azure/active-directory/conditional-access/concept-conditional-access-cloud-apps

Scrolling down it does list Microsoft Intune – but it has no link for more information on what it does! Microsoft Intune Enrollment is listed, and linked, but that link goes back to our MFA CA Policy link we from earlier!

Now that its all clear as mud, and we had to try something, we decided to also exclude Microsoft Intune as well as Microsoft Intune Enrollment. All cloud apps were still selected, and block access was still the condition.

clip_image007

Then select the two Intune Apps – Microsoft Intune Enrollment AND Microsoft Intune

clip_image009

We then tested again, and ENROLLMENT WAS SUCCESSFUL! By adding those two apps as exclusions the Policy blocks access to all non-compliant devices but still allows for new devices to enroll. This meets the need for this situation as we needed to block all non-compliant devices from accessing anything, but also giving them an opportunity to become compliant by registering with the tenant.

Let us know in the comments section if this helps or if you have another way of blocking access while allowing enrollment.

Thanks for reading!

Everything you wanted to know about Security and Audit Logging in Office 365

There are four primary audit log locations in Office 365. Depending on license level, these logs have varying lengths of retention.

  1. Office 365 “Unified Access Log”
    1. Enabled by ‘opt in’ (The first time you visit the log page, it asks if you want to enable it.)
    2. Goes back 90 days
    3. Accessible here: https://compliance.microsoft.com/auditlogsearch?viewid=Test%20Tab
    4. Documentation: Search the audit log in the Microsoft 365 compliance center – Microsoft 365 Compliance | Microsoft Docs
    5. There are four options for extending the logs beyond 90 days
    6. Option 1: purchase M365 E5 (or other license) “Advanced Audit” which can extend this log to 1 year
    7. Option 2: purchase ‘10-Year Audit Log Retention Add On’ (this add-on first became available for purchase in March 2021). Note: This policy is *not* retroactive.
    8. Option 3: Extend this into Sentinel to get correlation and default query templates
    9. Option 4: Use a 3rd party SIEM to query the Office 365 Management API.
      TIP: When you purchase the “Advanced Audit” license, it will reduce the throttling that occurs when querying the API (so for example you will see data in Splunk much faster!).
    10. Option 5: PowerShell
  2. Azure AD Audit Log
    1. Enabled by Default
    2. Goes back 30 days with an Azure AD P1 license (or 7 days with an Azure AD Free)
    3. Accessible here: Azure Audit Log
    4. Documentation: Audit logs in Azure Active Directory | Microsoft Docs
    5. Latency. Audit logs have a latency ranging from 15 minutes to an hour
    6. Activities. A complete list of each activity audited is available (here)
    7. Limits. The export limit from the web interface is 5,000 records. You can get around this by exporting the logs through one of the options below, which can also be used to extend retention.
    8. Option 1: Extend this log into Azure Log Analytics (aka Azure Monitor) to go beyond 30 days (learn how here)
    9. Option 2: Extend this log into Sentinel to get correlation and default query templates (learn how here)
    10. Option 3: PowerShell or Graph API.
  3. Azure AD Sign-in log
    1. Enabled by Default
    2. Goes back 30 days with an Azure AD P1 license (or 7 days with an Azure AD Free)
    3. Accessible here: Azure Sign-in Log
    4. Documentation: Sign-in logs in Azure Active Directory | Microsoft Docs
    5. Latency. Sign-in activity logs can take from 15 minutes to up to 2 hours for some records. According to the documentation, 95% of all logs will show up in 2 minutes.
    6. Limits. The export limit from the web interface is 5,000 records. You can get around this by exporting the logs through one of the options below, which can also be used to extend retention.
    7. Option 1: Extend this log into Azure Log Analytics (aka Azure Monitor) to go beyond 30 days (learn how here)
      NOTE: Unlike the Azure Audit Log, the Azure AD Sign-in logs require an Azure AD P1 or higher license to export into Log Analytics.
    8. Option 2: Extend this log into Sentinel to get correlation and default query templates (learn how here)
    9. Option 3: PowerShell or Graph API.
  4. Microsoft Cloud App Security
    1. Goes back 6 months
    2. Not enabled by default, requires configuration. You must go to “Connected Apps” then click the three dots to make it include the additional log sources as shown here:
      clip_image002
    3. Requires an M365 E5 license or O365 E5 license (or available via Stand Alone)
    4. Accessible here: https://portal.cloudappsecurity.com/#/audits/
    5. Option 1: Extend this log into Sentinel to go beyond 6 months

Reporting

There are a few really useful built-in reports that analyze the logs and produce findings.

  • Risky sign-ins – A risky sign-in is an indicator for a sign-in attempt that might have been performed by someone who is not the legitimate owner of a user account.

    Latency can range from as little as 5 minutes, to a maximum of 2 hours.

  • Users flagged for risk – A risky user is an indicator for a user account that might have been compromised
    Latency can range from as little as 5 minutes, to a maximum of 2 hours.
  • Risk Detections. Azure AD uses adaptive machine learning algorithms and heuristics to detect suspicious actions that are related to your user accounts. Each detected suspicious action is stored in a record called a risk detection.
    Here are the latencies associated with when the risk detections will appear:
    image

Advanced Audit License

As noted above, the new Advanced Audit License extends the retention of the UAL audit log to 1 year and speeds up 3rd party API throttling. A 3rd useful capability is the additional fields that get audited when this license is applied to mailboxes. The ability to log the ‘MailItemsAccessed’ (some may know this as MessageBind, that is what it was called in on-premises Exchange). Additional entries including exactly which items were sent from the compromised account are also logged.

The Send event is also a mailbox auditing action and is triggered when a user performs one of the following actions:

  • Sends an email message
  • Replies to an email message
  • Forwards an email message

Investigators can use the Send event to identify email sent from a compromised account. The audit record for a Send event contains information about the message, such as when the message was sent, the InternetMessage ID, the subject line, and if the message contained attachments. This auditing information can help investigators identify information about email messages sent from a compromised account or sent by an attacker. Additionally, investigators can use a Microsoft 365 eDiscovery tool to search for the message (by using the subject line or message ID) to identify the recipients the message was sent to and the actual contents of the sent message. You can also run the Search-UnifiedAuditLog -Operations Send or Search-MailboxAuditLog -Operations Send commands in Exchange Online PowerShell.

The MailItemsAccessed mailbox auditing action covers all mail protocols: POP, IMAP, MAPI, EWS, Exchange ActiveSync, and REST.

This is useful in a forensic investigation because it logs which emails were accessed. Imagine the relief of a Legal team when a hacker only accessed 10 items instead of a million items, and none of those 10 items contained PII or PHI data.

Note: When a protocol such as POP, IMAP, or MAPI over HTTPS (aka Outlook Anywhere) syncs a folder, then a single audit event is logged that the folder contents were synced rather than an entry for each item in the folder. (Reference).

Note: If an attacker generates more than 1,000 audit records in 24 hours in a mailbox, then this audit log is paused for 24 hours =( So a crafty hacker could overwhelm the log in order to hide activities (the pause occurs for 24 hours). (Reference)

SearchQueryInitiatedExchange

The SearchQueryInitiatedExchange event is triggered when a person uses Outlook to search for items in a mailbox. Events are triggered when searches are performed in the following Outlook environments:

  • Outlook (desktop client)
  • Outlook on the web (OWA)
  • Outlook for iOS
  • Outlook for Android
  • Mail app for Windows 10
  • Investigators can use the SearchQueryInitiatedExchange event to determine if an attacker who may have compromised an account looked for or tried to access sensitive information in the mailbox. The audit record for a SearchQueryInitiatedExchange event contains information such as the actual text of the search query. The audit record also indicates the Outlook environment the search was performed in. By looking at the search queries that an attacker may have performed, an investigator can better understand the intent of the email data that was searched for.

Similar to searching for mailbox items, the SearchQueryInitiatedSharePoint event is triggered when a person searches for items in SharePoint. Events are triggered when searches are performed in the following types of SharePoint sites:

  • Home sites
  • Communication sites
  • Hub sites
  • Sites associated with Microsoft Teams

Investigators can use the SearchQueryInitiatedSharePoint event to determine if an attacker tried to find (and possibly accessed) sensitive information in SharePoint. The audit record for a SearchQueryInitiatedSharePoint event contains also contains the actual text of the search query. The audit record also indicates the type of SharePoint site that was searched. By looking at the search queries that an attacker may have performed, an investigator can better understand the intent and scope of the file data being searched for.You can also run the Search-UnifiedAuditLog -Operations SearchQueryInitiatedSharePoint in Exchange Online PowerShell. You must enable SearchQueryInitiatedSharePoint to be logged so you can search for this event in the audit log. For instructions, see Set up Advanced Audit.

In additional to the events listed above, there are also unique audit events that are only audited when the Advanced Audit license is owned:

Alerting

You can configure Alert Policies to notify you when certain things happen. This can be done in M365, Azure Monitor, MCAS, or Sentinel.

Audit Log Bypass

This article describes how it is possible for a user with administrative rights to bypass Mailbox audit logging, so be sure to document the configuration, and any changes to this configuration during a forensic investigation.

Manage mailbox auditing – Microsoft 365 Compliance | Microsoft Docs

PowerShell Modules

There are a variety of PowerShell modules available, designed to automate gathering the logs or searching them for use in forensic investigations. If you find any more, send me a DM on Twitter at @ITGuySocal

1. Hawk

2. DFIR-O365RC

3. Azure AD Toolkit (This is what Microsoft’s DART team uses)

4. CrowdStrike Reporting Tool for Azure (CRT)

5. Sparrow (this is what the US Government’s CISA’s Cloud Forensics team wrote back in December 2020 to identify activity in a tenant associated with the TTPs used by the hackers who compromised SolarWinds).

6. 365BlueTeamKit by Chaim Black

7. Office 365 Extractor by Joey Rentenaar and Korstiaan Stam from PwC Netherlands Incident Response team

8. Mandiant Azure AD Investigator This is similar to Sparrow in that it was built to  detecting artifacts that may be indicators of Nobelium/UNC2452/Sunburst or other threat actors that use those same techniques.